Welcome!
The atmosphere you’re breathing right now is made of about 78% nitrogen, 21% oxygen, and a whole bunch of other impactful gasses squeezed into that last percent. If you take a deep breath, you’ll feel your body registering all of it--satisfying deep evolutionary impulses to breathe fresh air. Nowadays, much of our livelihoods are tied to another aspect of the atmosphere--the much less natural field of radio waves and signals that are traveling around and through us constantly.
The internet, whether we access it at home through a connection, or on our phone in public through a cell signal, is a magical and beautiful place built for everyone. It is the ultimate enabler--putting the world at our fingertips and exposing it to you--but it can be equally dangerous to folks who appreciate anonymity, if they don’t understand the risks involved. This zine will tackle a very specific part of those risks, and offers a solution to protestors, organizers, journalists, and similar folks who need to be able to communicate securely with each other and/or the outside world during protests.
The newt-net is the name for my prototype mesh network, which allows you to cast a WiFi signal from any out into the world to another place where it can be more useful to you. This is an alchemical projection, harnessing inert minerals in specific arrays (circuit boards), imbuing them with power and purpose through runes (the digital interfaces), and casting that power out into the world as a vessel for your will (to establish positive comms with your team). It all sounds very ambitious and arcane, and it’s built on a world of github repositories and hard code, but I promise it’s a forgiving learning curve. This guide answers all the questions I had along the way, as someone who had zero coding experience four months ago, and strives to acknowledge at least most of all the great resources that helped me along the way. I can only speak to a North American implementation, but other countries will require different hardware and chipsets in order to function legally. You can check research progress towards that at the OpenMANET website.
Building out this type of mobile network infrastructure will allow the people you trust to communicate pseudo-off-grid or in cyber-denied environments, with the traditional apps and tools they already use on a daily basis. It will allow you to use a Signal group chat when the cell-towers are overcrowded and the local has dropped to nothing, or to add new first responders or organizers into your plan with nothing more than a WiFi password. It all even works in airplane mode, so your location and ID aren’t pinging off the local cell towers.
The newt-net is a libre project, and a summary of years of other people’s incredible work. My entry to the community was through DataSlayer x Parallel's project, which is a paid guide that includes videos of actual hardware assembly. If you struggle to understand some of the concepts in this Zine, that guide is a great resource you can find here. My technique for building newt-net involves zero of the minimal coding that DataSlayer’s nodes requires, but if you do want a superb introduction to communicating with your computer, I recommend Solarpunk.Cool’s “The Map is the Territory”--a really accessible introduction to the command line. More acknowledgements to follow!
Ingredients
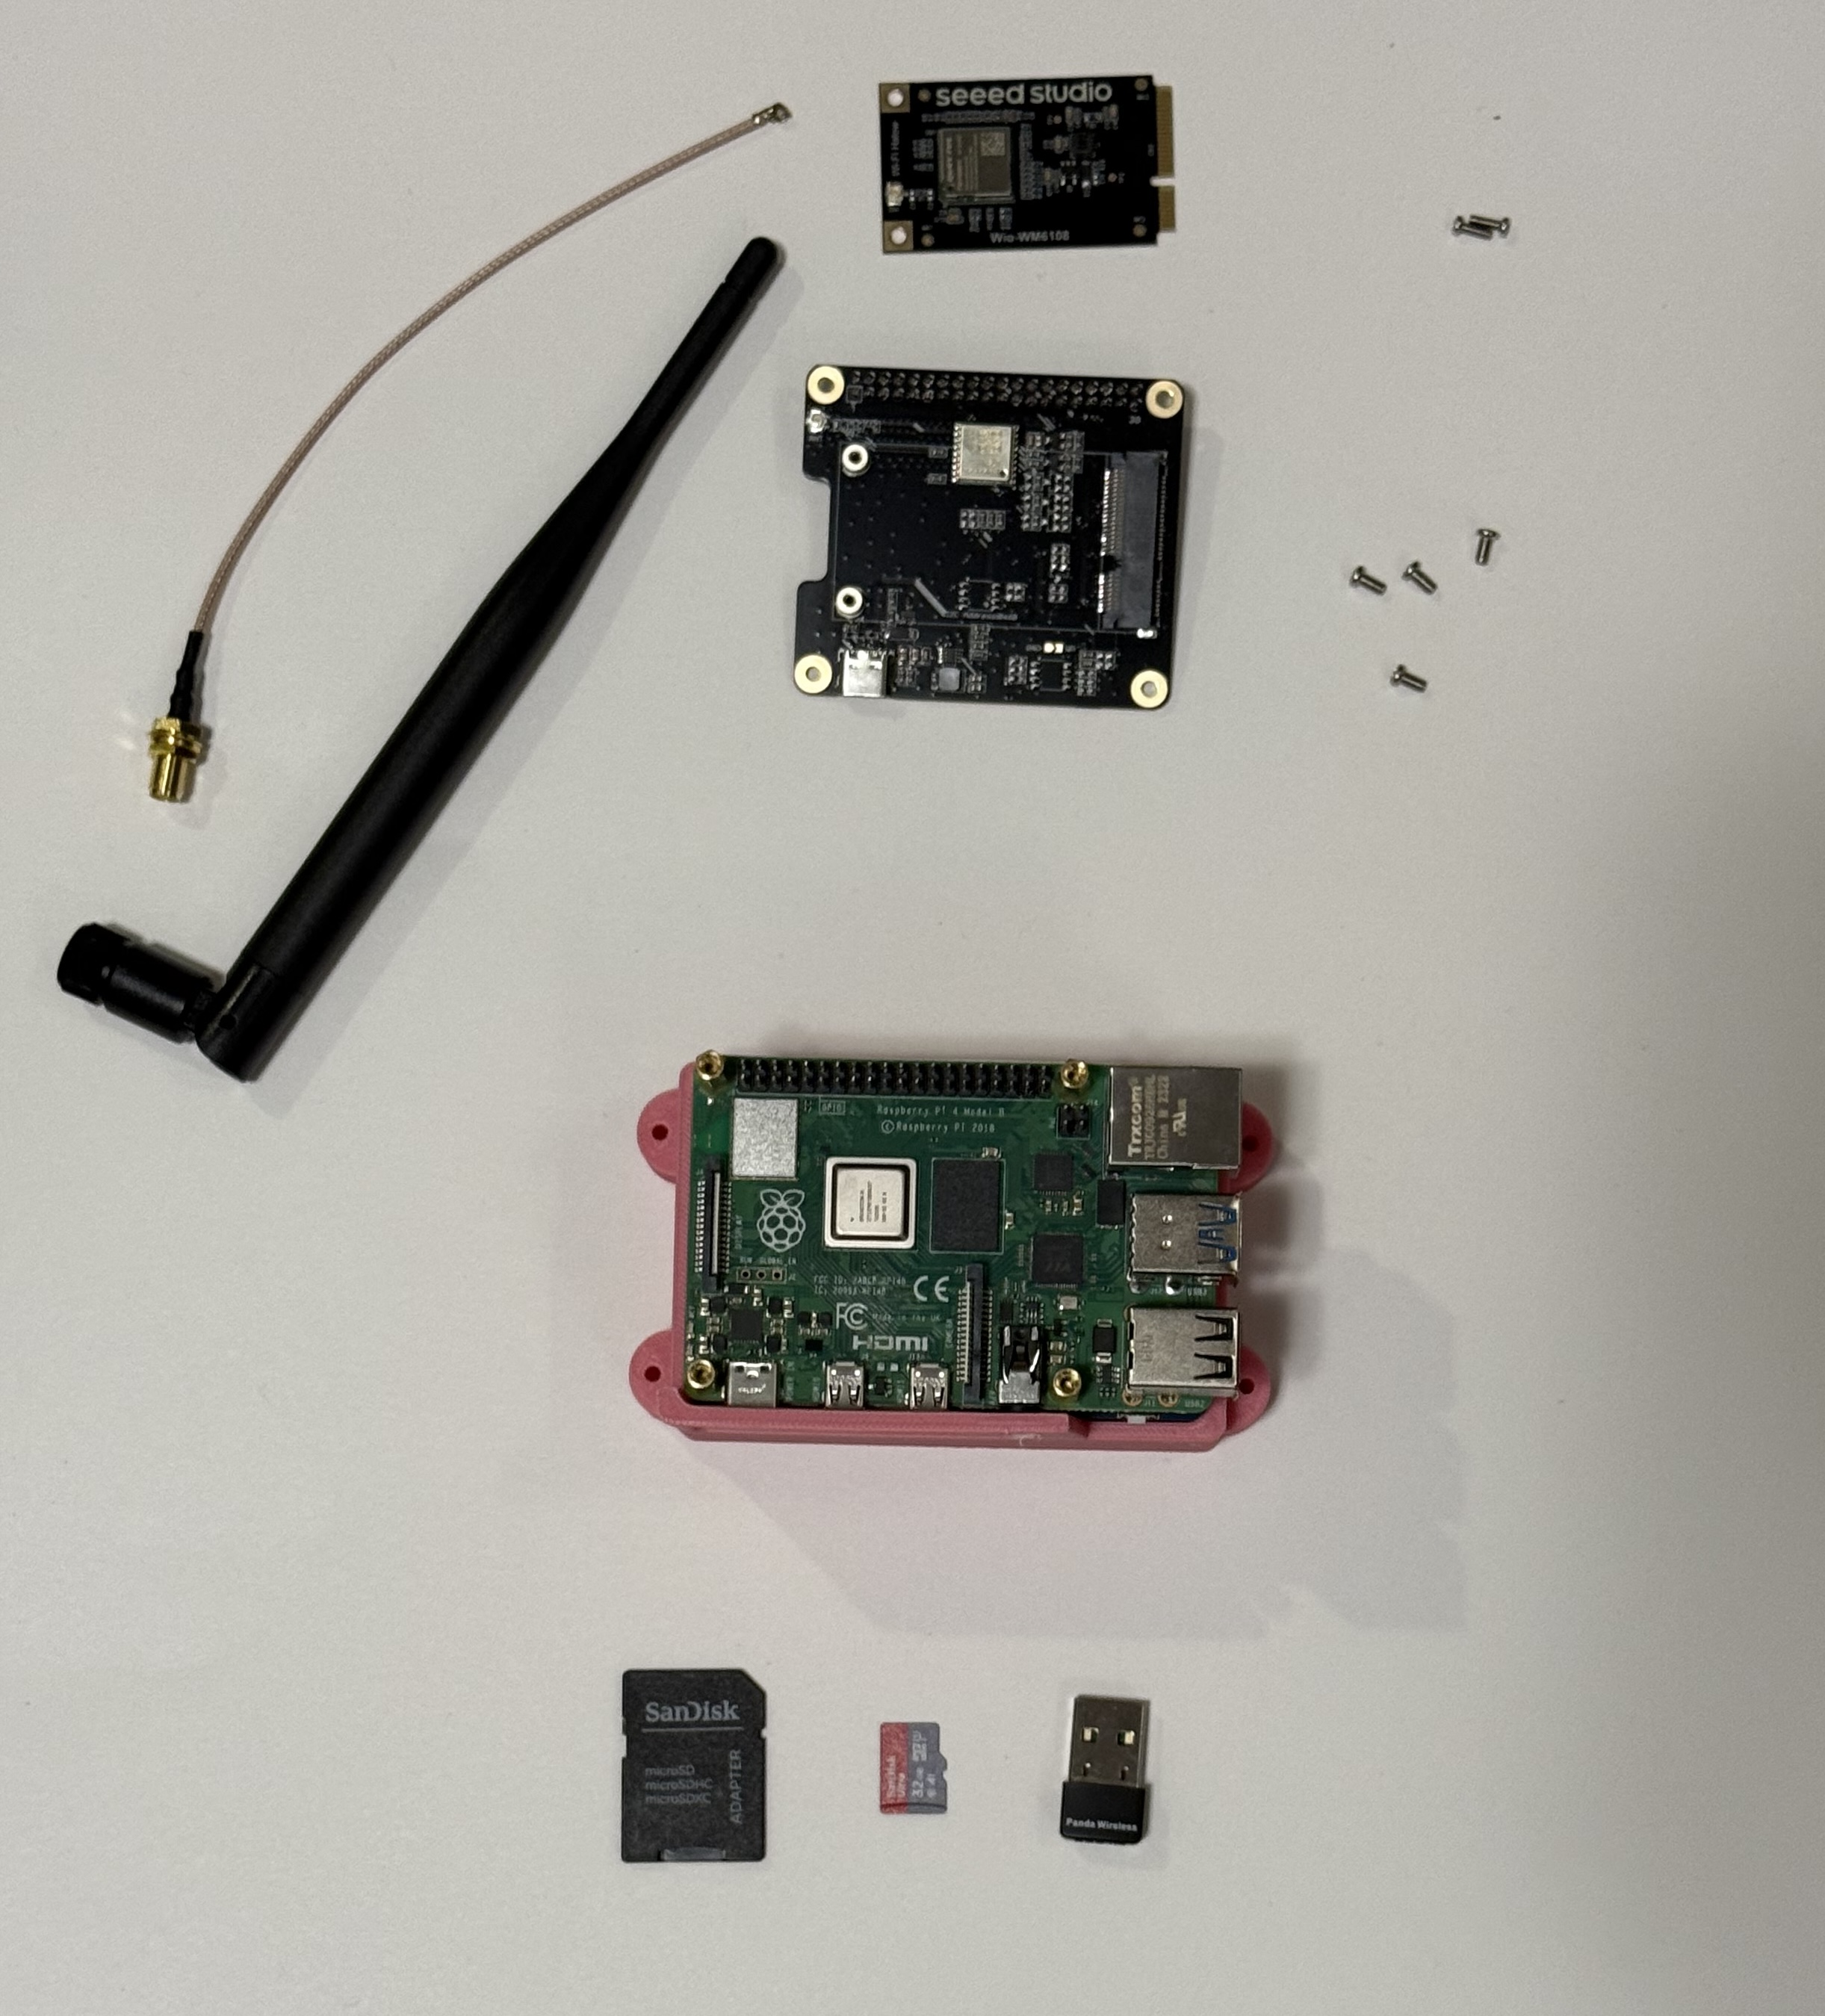
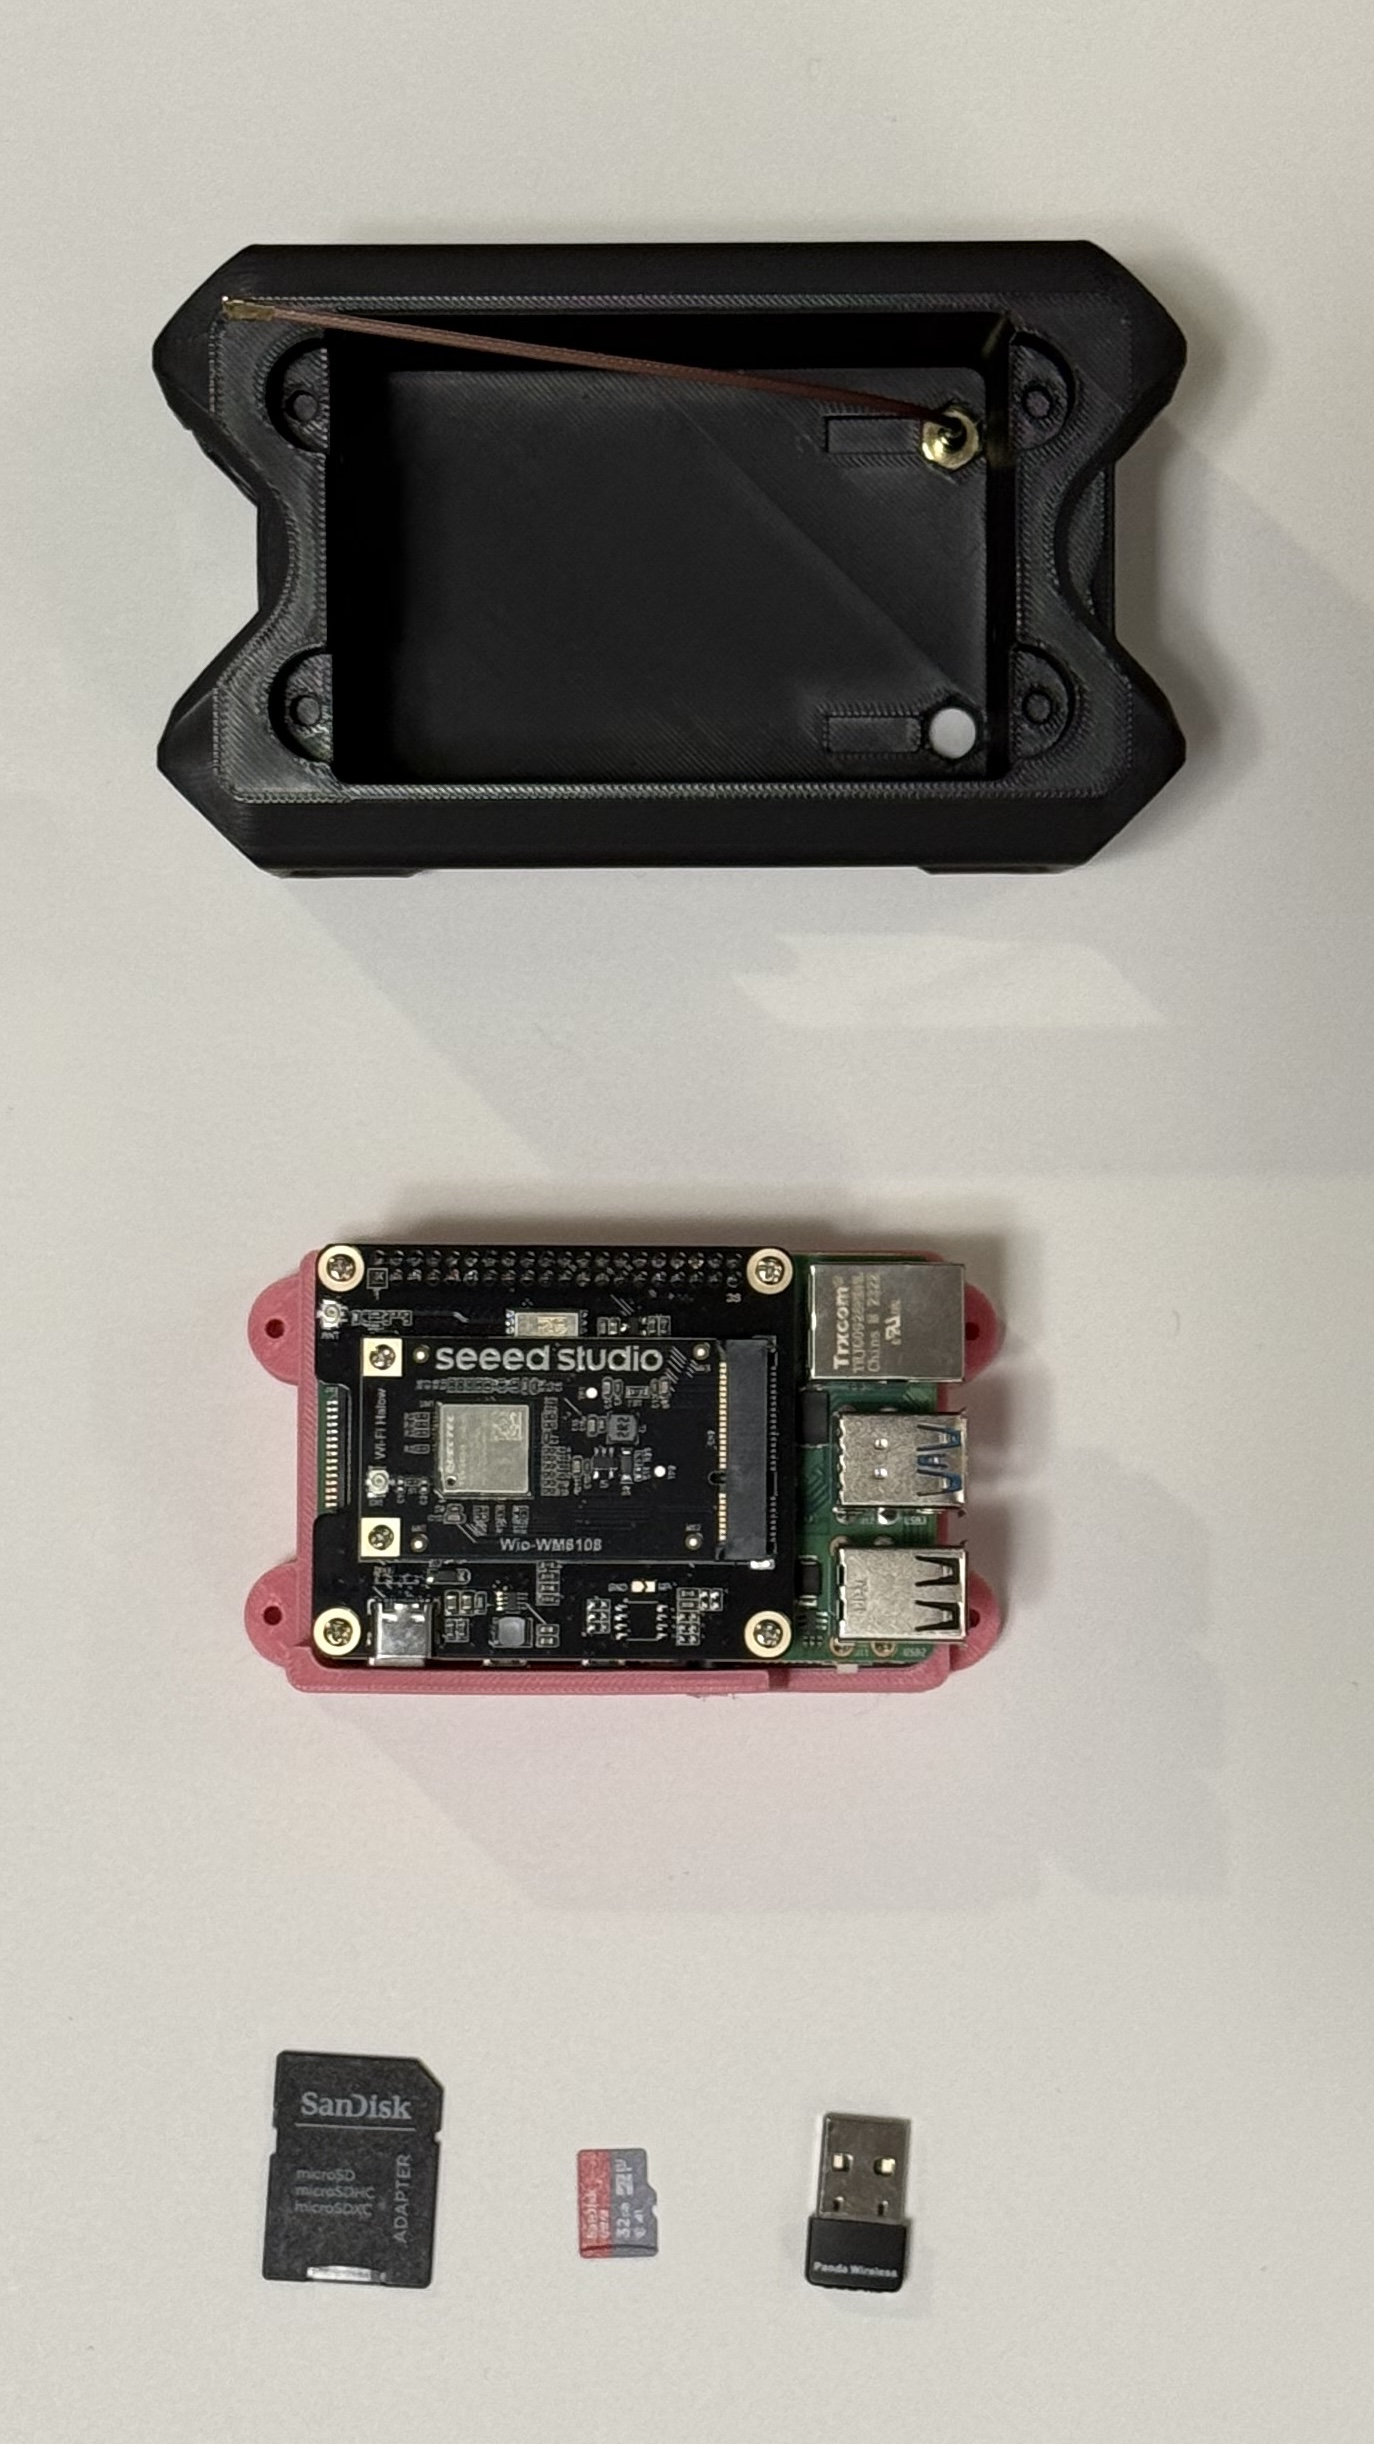
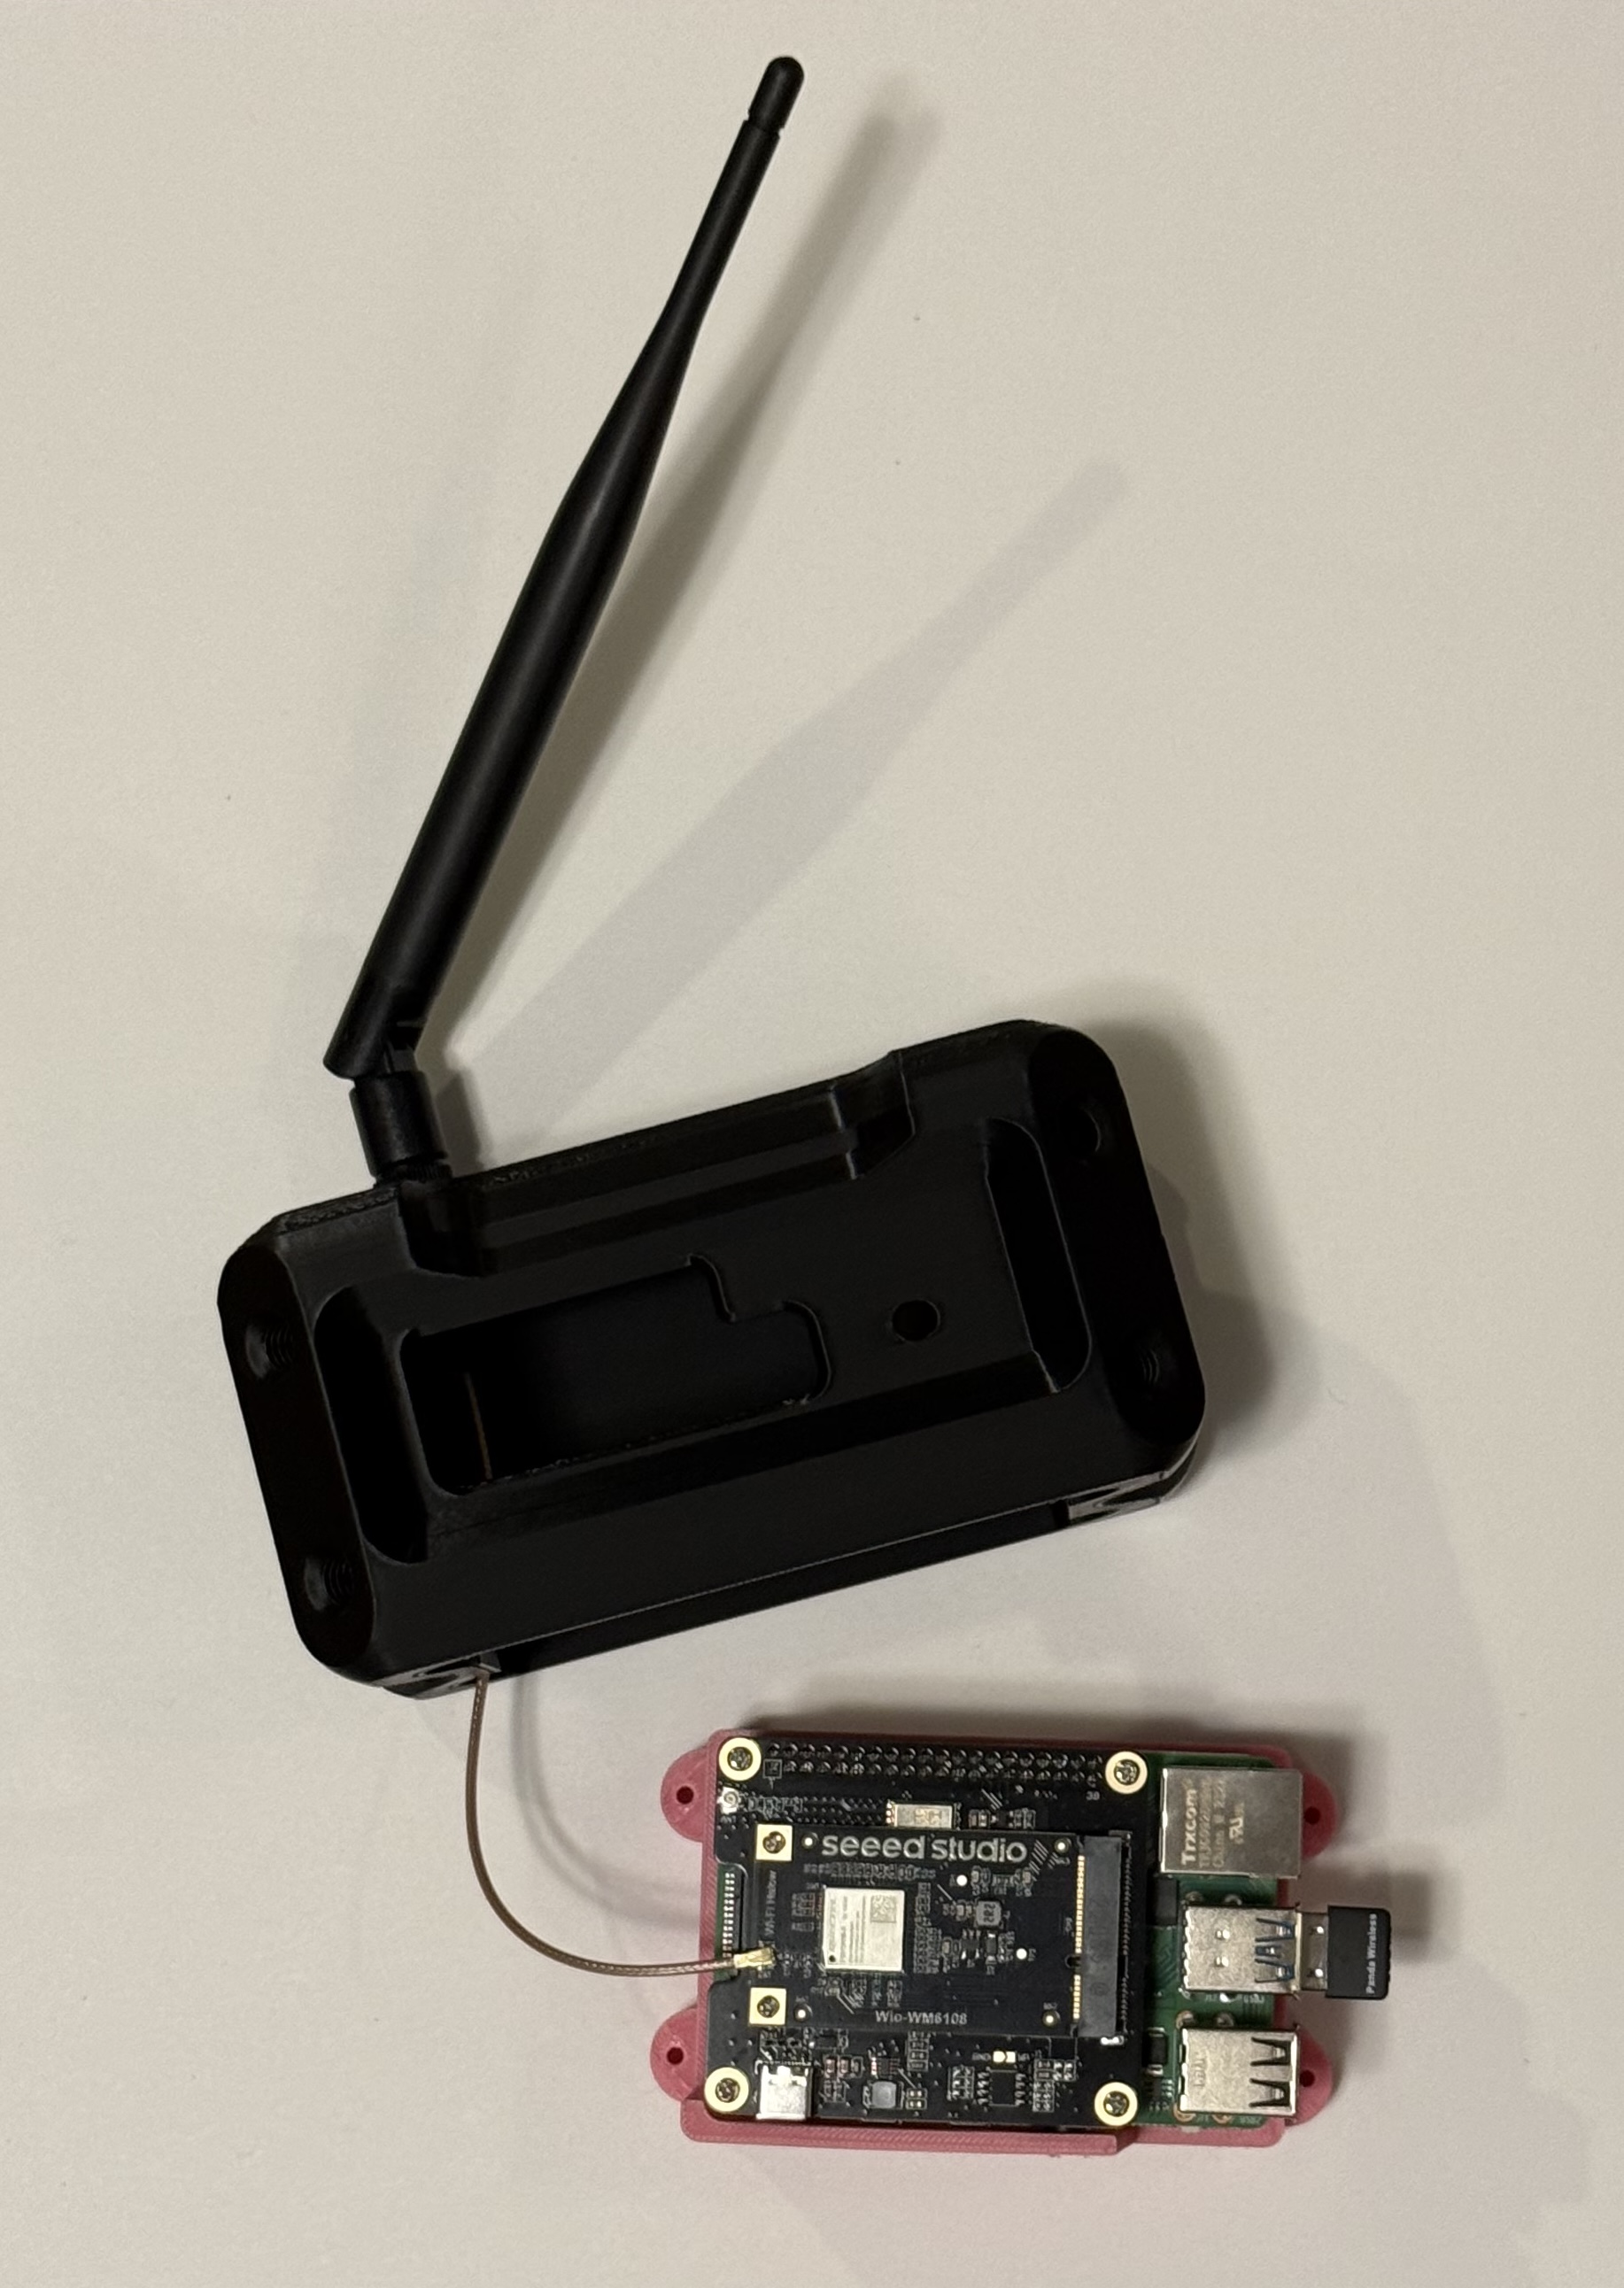
One of the easiest ways to build community is to bake some food for your neighbors, and in the same fashion our MANET starts with baking up some fresh, hot ! They’ll each be wearing two “hats,” which is just a circuit board that goes above or below the RPi in the same footprint, and interfaces with it via one of the many pins. You’ll need at least two RPi-nodes to start testing your network and many of these components come in packs, but I’ve listed the ingredients-per-node below. I’ve numbered each ingredient on the diagram in (roughly) the order you’ll need to add it to your assembly. At current (Q1 2026) prices, each node costs less then $260 to make.
There is an Amazon cart collection curated by DataSlayer that he receives affiliate links from here, but I found better results with a few different components so I’ve linked and labeled everything I used below:
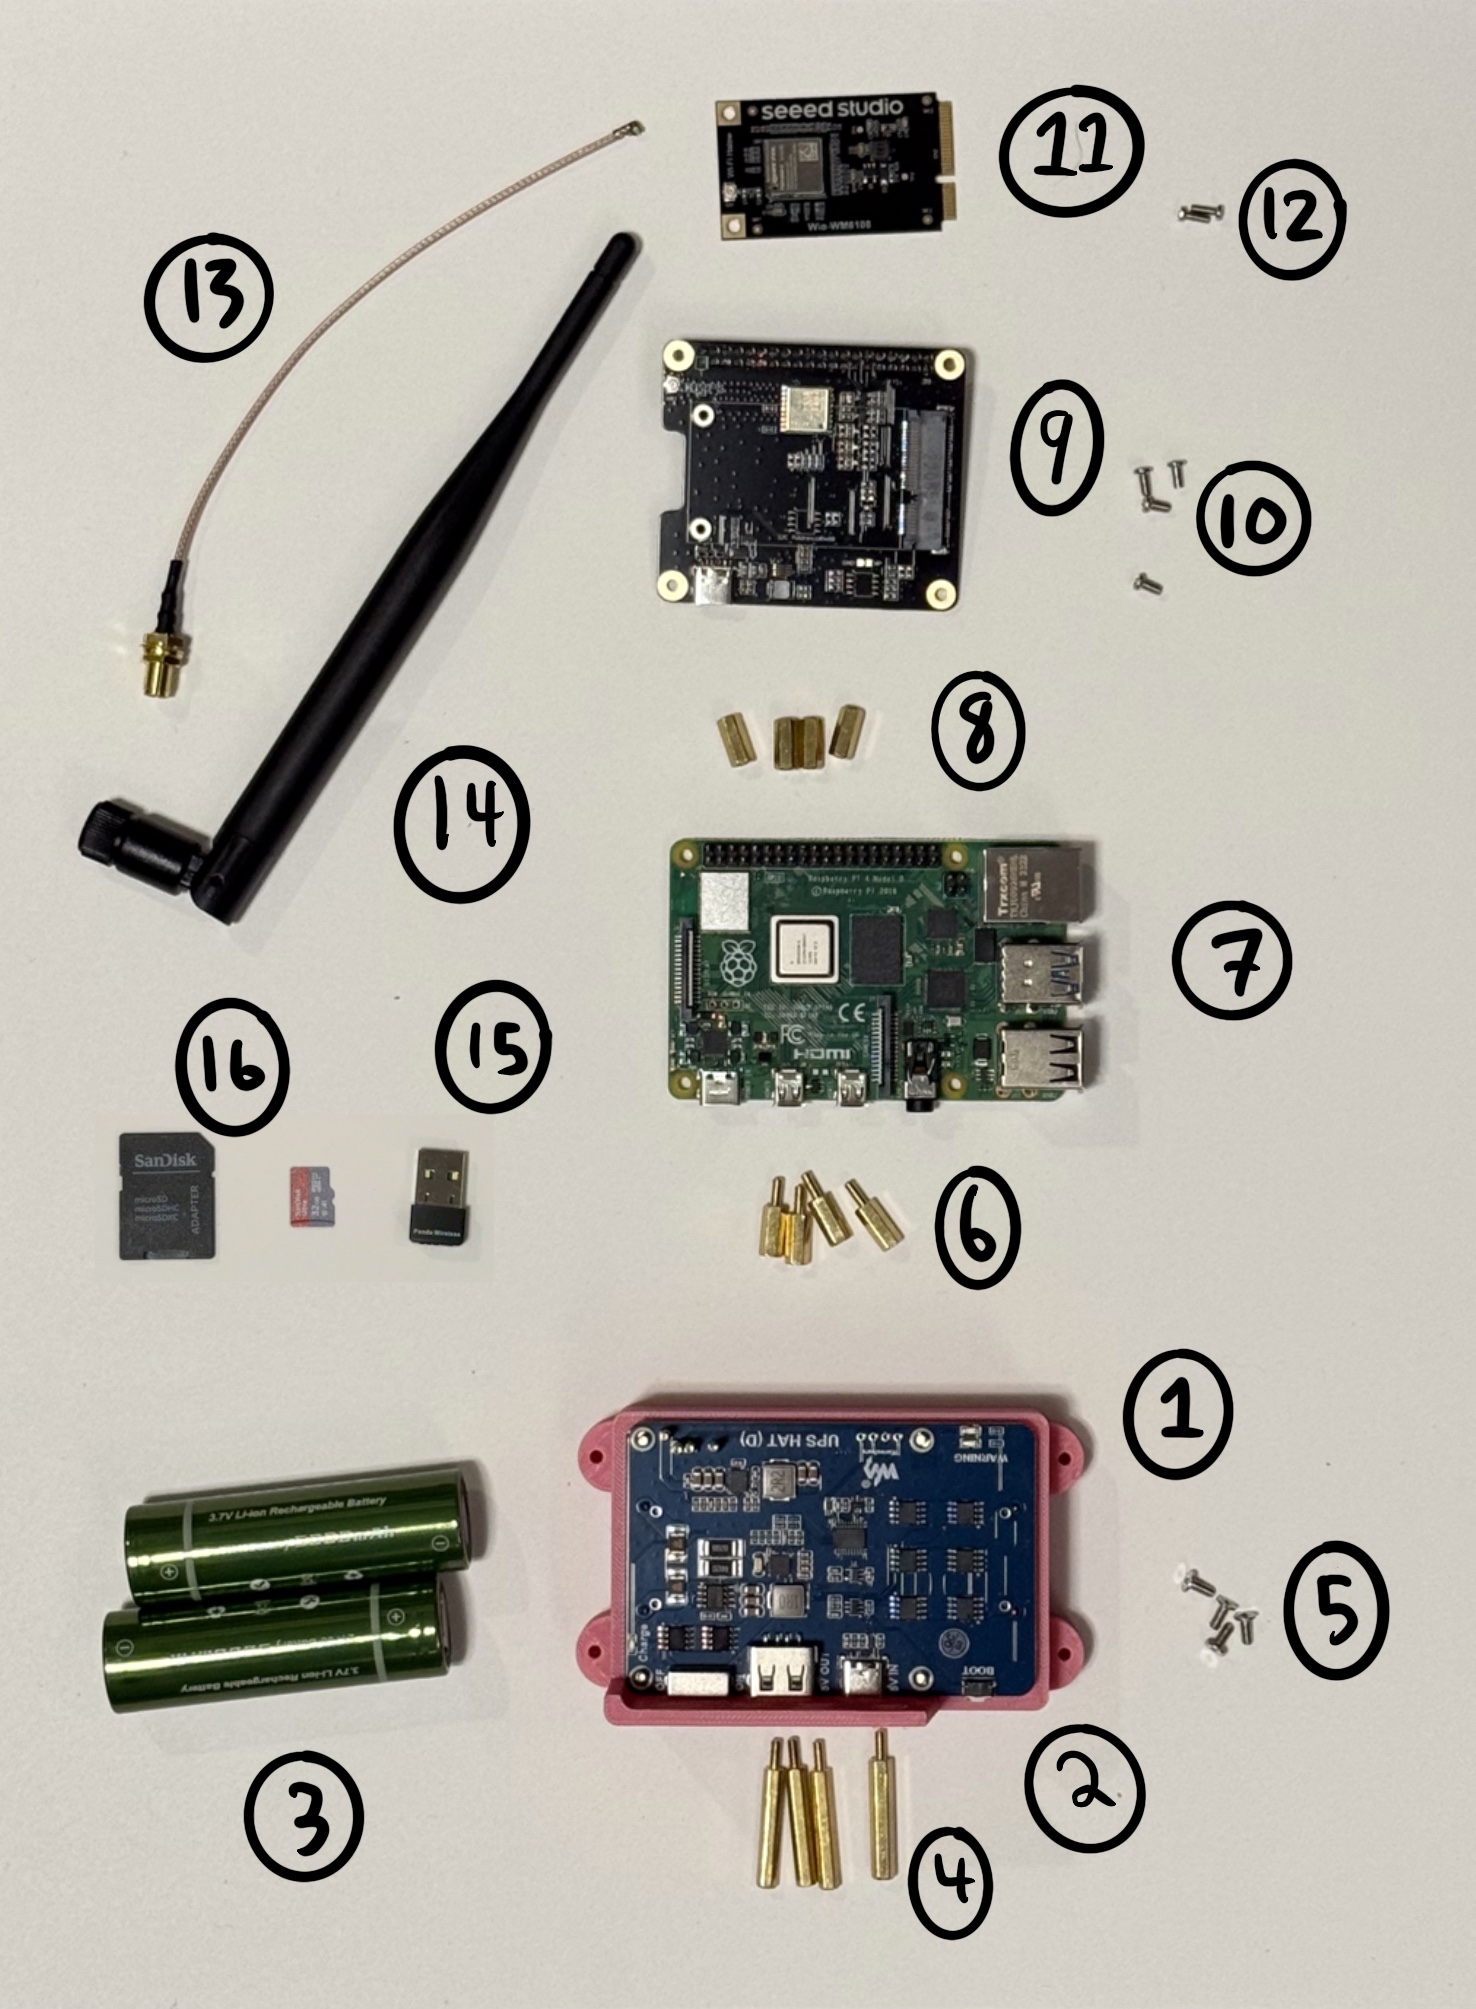
- 3D-printed Housing (Base) [DOWNLOAD]
- 5V Uninterrupted Power Supply (UPS) Hat for RPi
- 2ct. 21700 Batteries
- 4ct. 25mm x M2.5 M-F Standoff (w/ Kit)
- 4ct. M2.5 Tapered Philips Screws (w/ Kit)
- 4ct. 11m x M2.5 M-F Standoff
- Raspberry Pi 4 w/ at least 8GB Ram
- 4ct. 11m x M2.5 F-F Standoff
- WM1302 Mini PCIe Adapter Hat for RPi
- 4ct. M2.5 Flat-top Philips Screw (w/ Kit)
- Wio-WM6108 WiFi HaLow Board
- 2ct. 6mm M2 Philips Screw (w/ Kit)
- 6in SMA to IPX Adapter
- 915 MHz (Mesh/ LoRa/ HaLow) Antenna
- 802.11 Panda WiFi Dongle
- 32+ GB microSD (and Adapter)
Not-Pictured: 3D-printed Housing (Shell) [DOWNLOAD], Ethernet cord and an adapter for your computer.
Crafting
You’ll need 3D-printer* access to make the housing components, a philips screwdriver, and about an hour of time to build your first node. After you get the hang of it, it can take as little as 20 minutes to build and flash a node. I usually need to use a drill with a ⅜” bit as well, in order to modify the Housing Base for access to the 3.5mm audio jack on the RPi. I don’t use headphones with it, but I find that mod is necessary to get the base to sit flush against the RPi and slide into the shell. To lower the barrier of entry even further, you can even pay a multitude of reputable online services to print the housing components for you.
Once you have your tools and prints in front of you, and all the components unboxed, it’s time to begin! Take a good look at your workspace and make sure you have a tidy enough area for all the gear and your computer, and you’ll be able to work effectively.
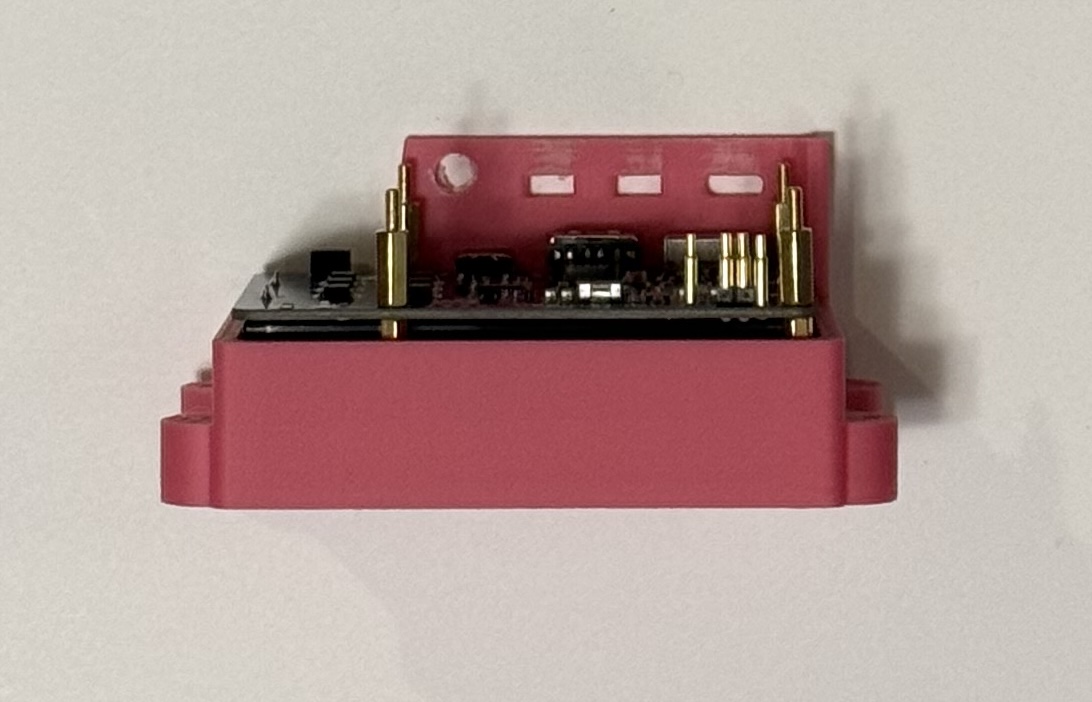
- Insert the batteries {3} into the UPS {2}
- Attach the 25mm {4} and 11mm {6} M-F standoffs through the four holes in the circuit board
- Place the UPS assembly into the Housing Base {1} and attach it in place with the M2.5 Tapered Philips Screws {5}
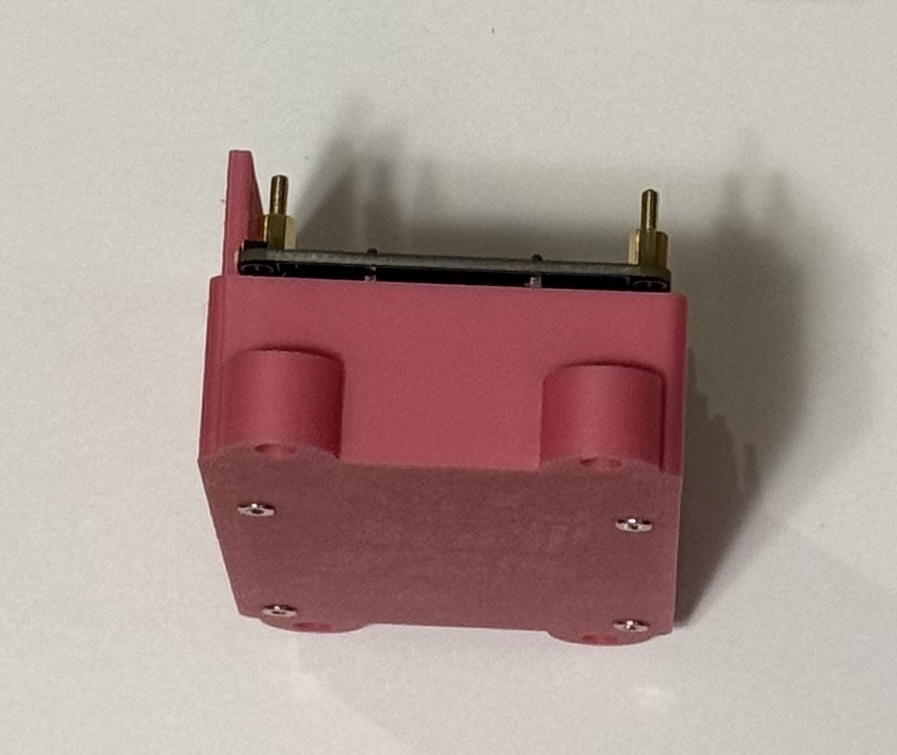
- Place the RPi {7} onto the standoffs, and secure it with the 11mm F-F standoffs {8} above
- This will be where you may choose to drill the audiojack hole in the Housing Base to help the fit, as pictured below
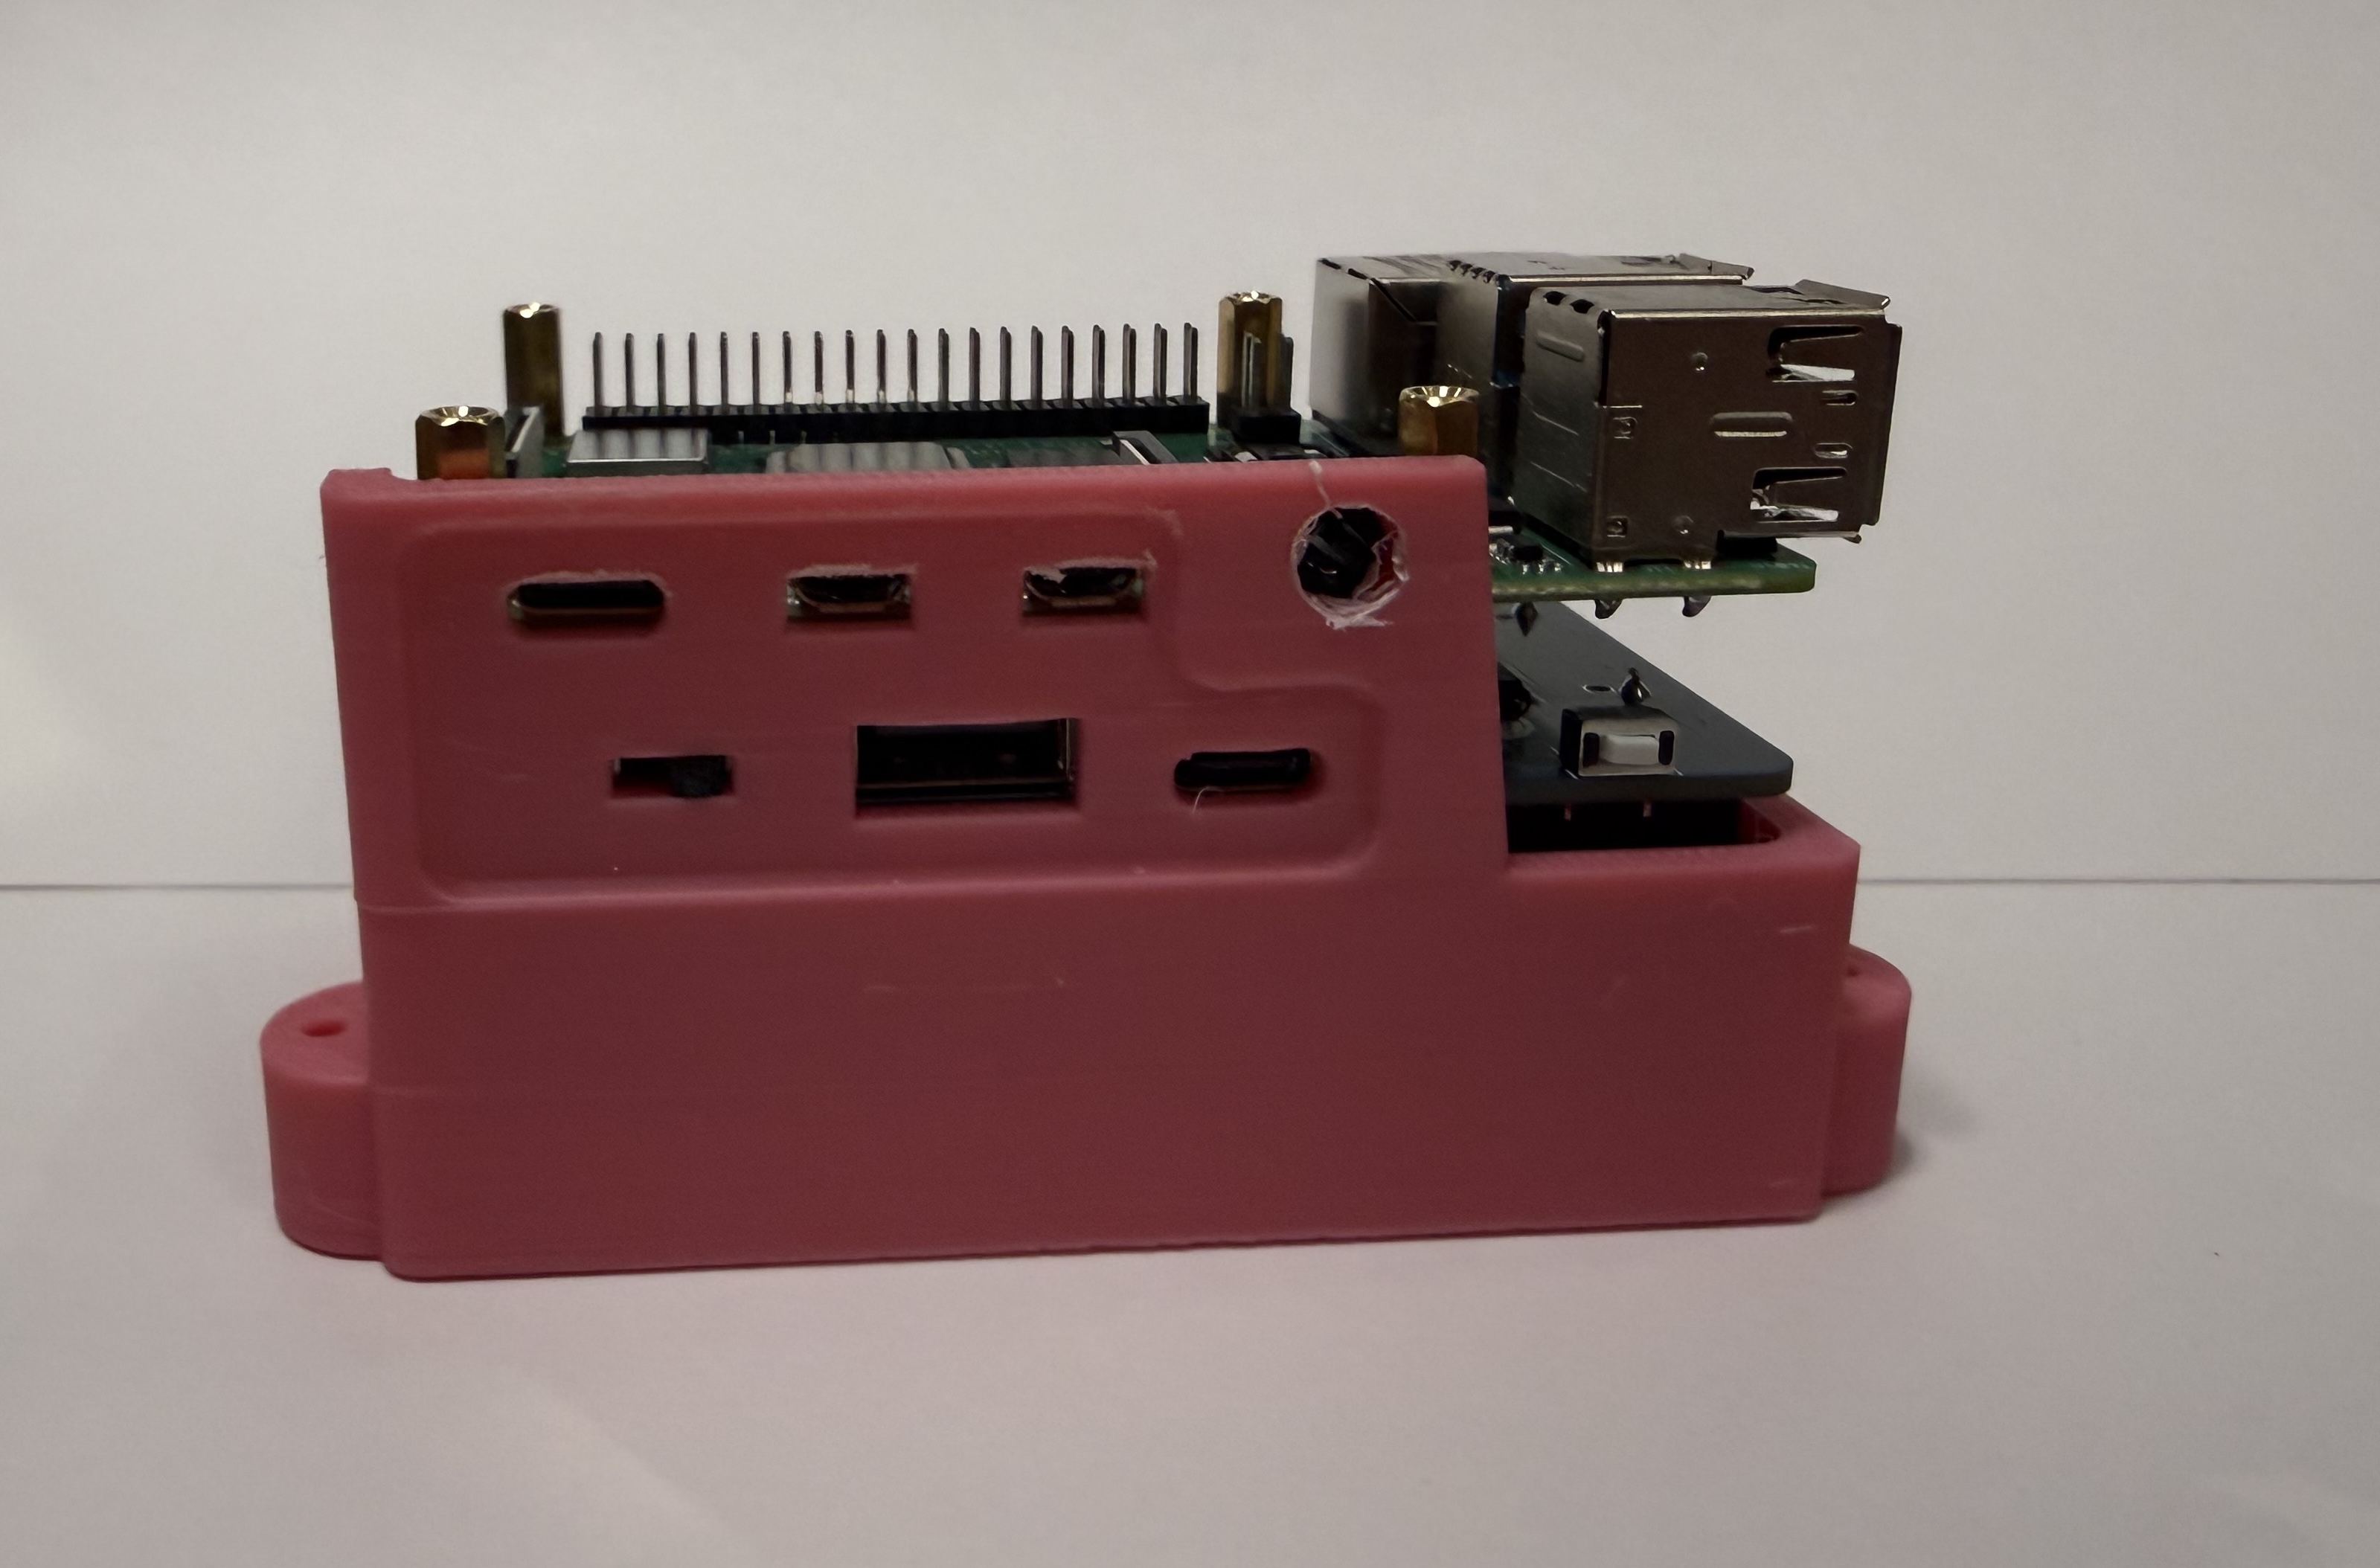
*You might have difficulty aligning the RPi USB ports with the base holes, because of the print quality or the standoff stack. You can sand or file the holes to increase the clearance if it's aggregious. Mine are usually half a mm off or so, which does prevent access to the ports. That won’t matter for any of our applications, so don’t fret about it too much.
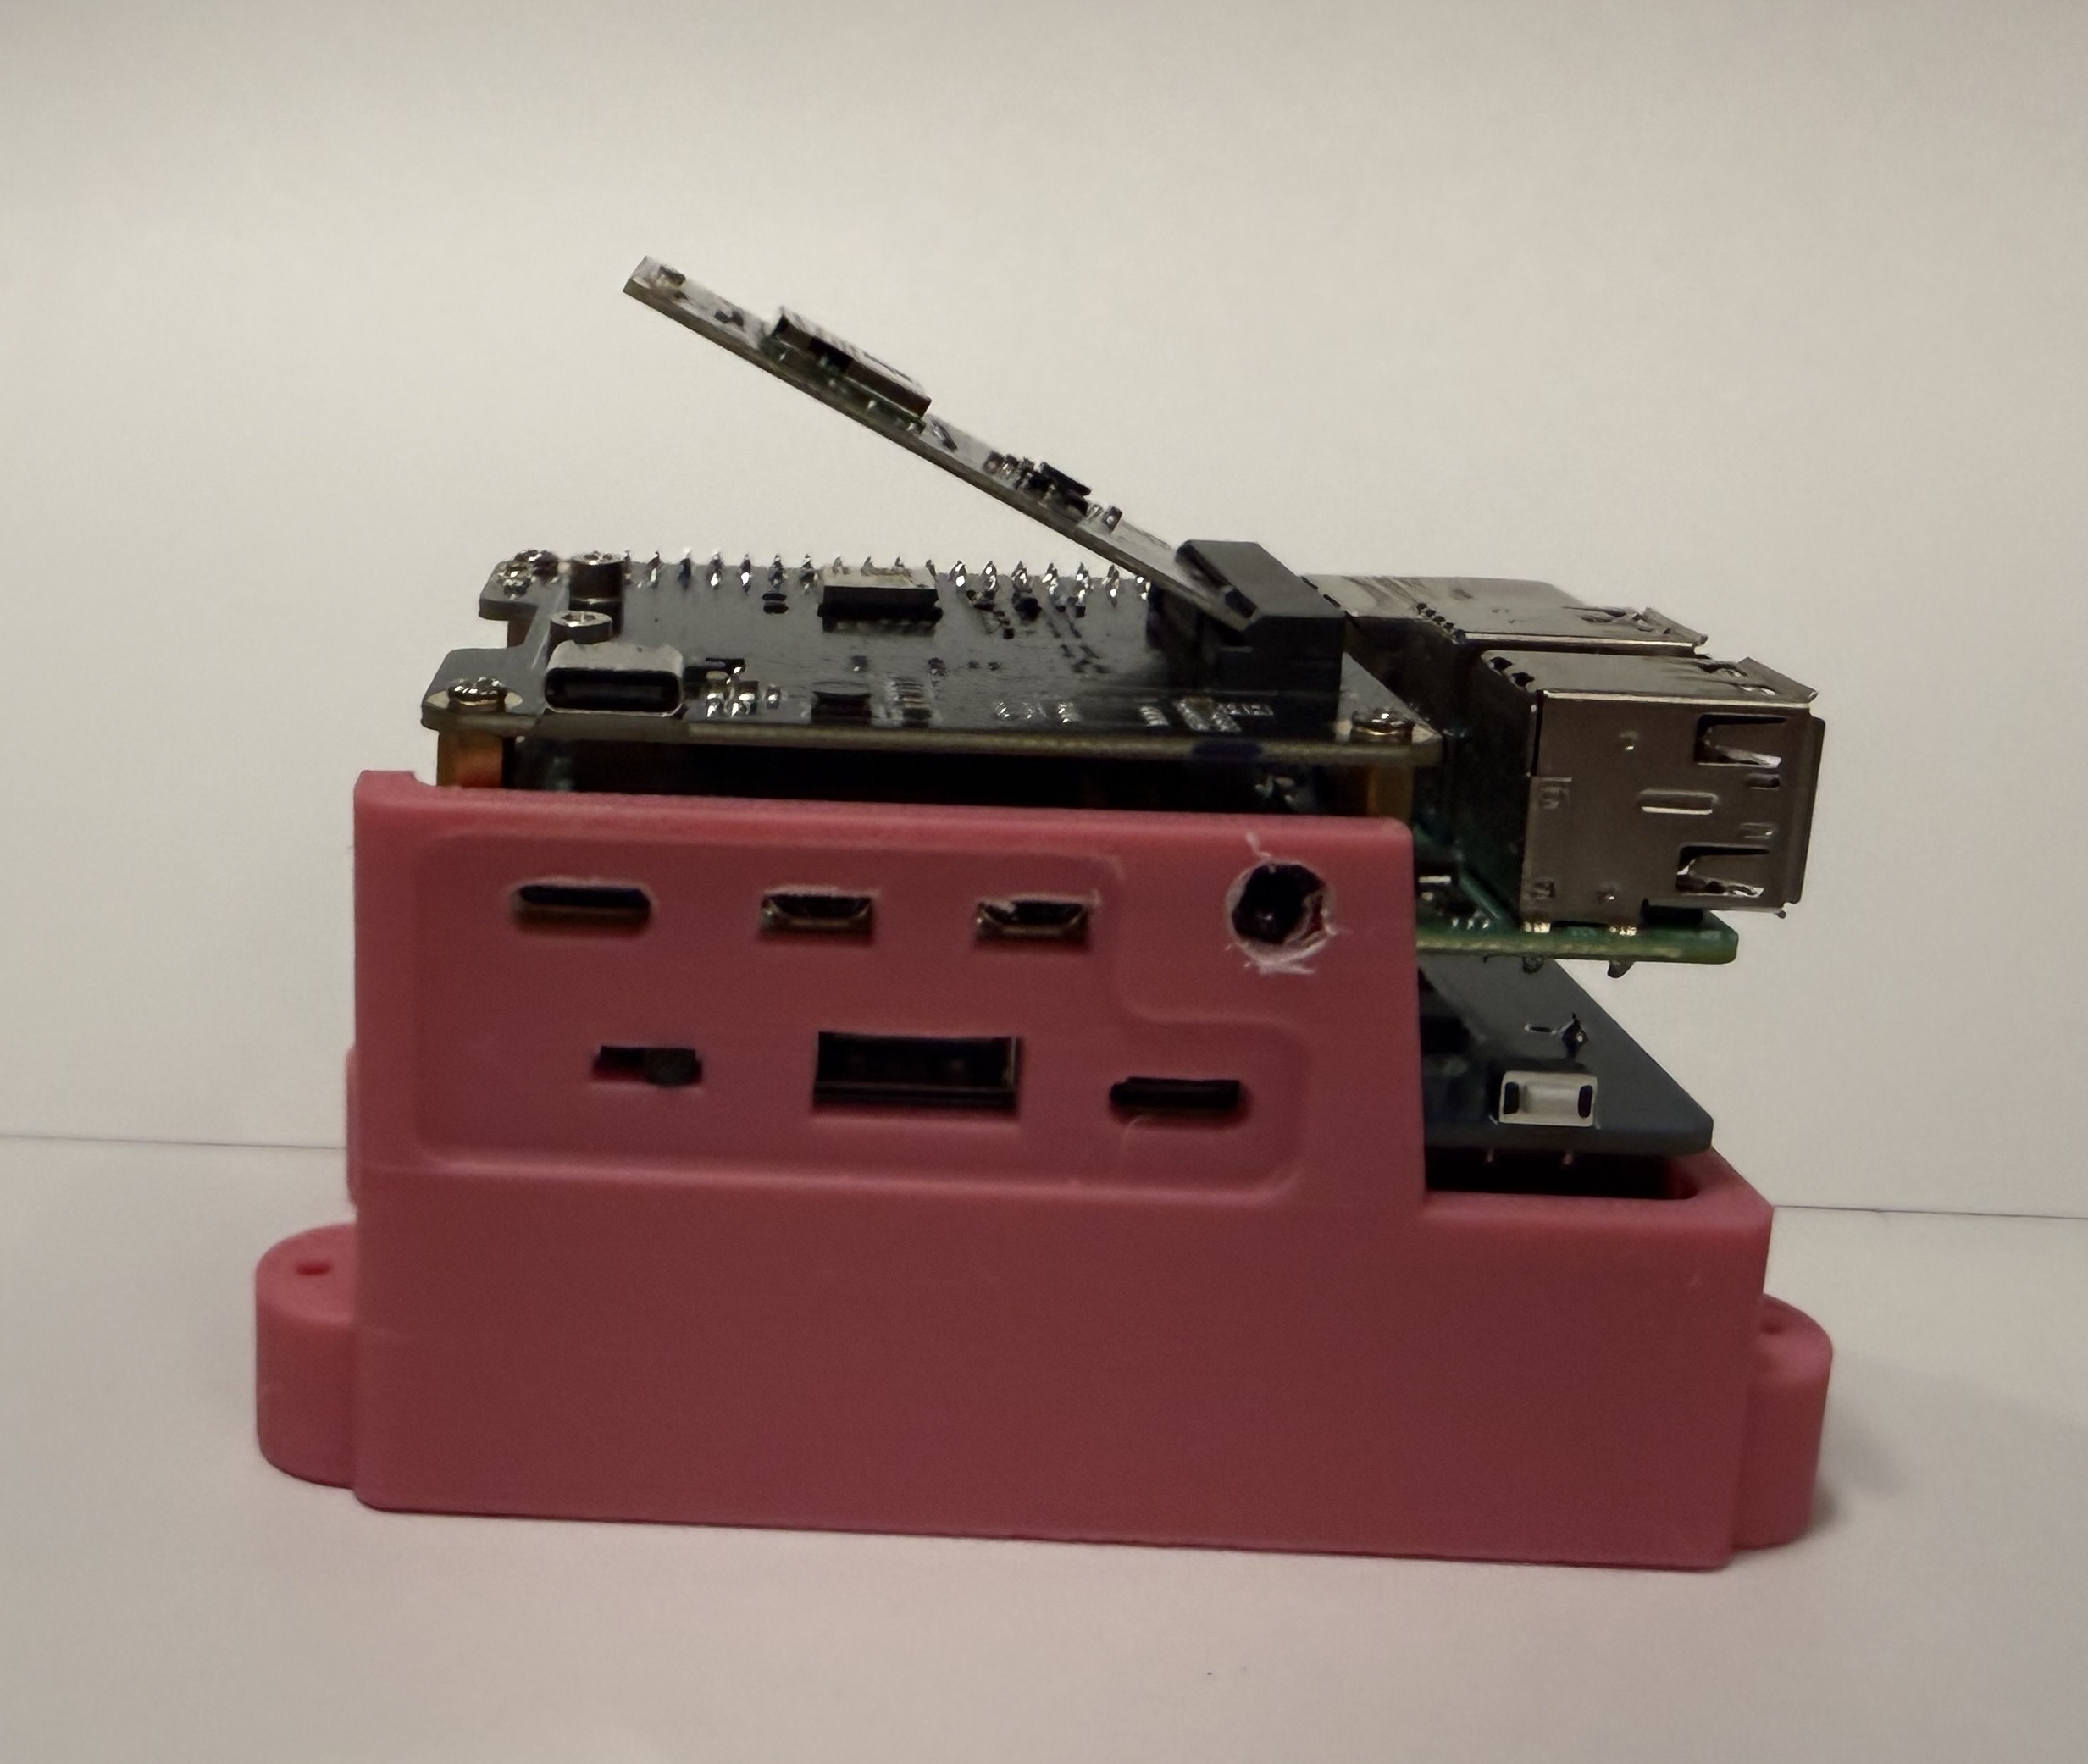
- Rest the Mini PCIe adapter hat {9} on the standoffs and secure with the M2.5 flat-top phillips screws {10}
- Insert the WiFi HaLow board {11} at a ~45º angle into the PCIe slots, and then push down gently against the spring tension until it rests on the integrated M2 standoffs
- Attach the HaLow board to the adapter hat with the M2 screws {12}
- Screw the SMA antenna adapter {13} into the hole opposite the side interface cutaway on the housing shell
- Screw the Meshtastic Antenna {14} onto the SMA threads until it’s hand-tight
- Plug the end of the SMA adapter onto the labeled IPX port on the HaLow board
- Insert the Panda WiFi {15} dongle into the bottom USB port closest to the Ethernet on the RPi
It’s as easy as that! Now we’re ready to turn this medley of parts into something alive and useful.
You can test the fit of the housing and base assembly by taking the Panda dongle out, but make sure the SMA adapter stays attached to the board. You never want the node to be running without the 915 MHz antenna attached, as it may fry the HaLow chip. The Panda dongle is less sensitive, but I recommend only taking it out and reinserting it while the node is turned off, as a state change can confuse the software while it runs.
Transmutation
The act of transmutation--bringing minerals alive and imbuing them with power--can be a harrowing thing to the uninitiated. This is where most of my troubleshooting occurred, but it’s a remarkably simple process with the tools that Morse Micro provides to configure the nodes. Let's walk through it step-by-step!
First, you’ll want to gather the physical and digital tools required for this alchemy. You’ll need the SD card {16}, an ethernet cord, and whatever adapters or dongles you’ll need to plug both of them into your computer.
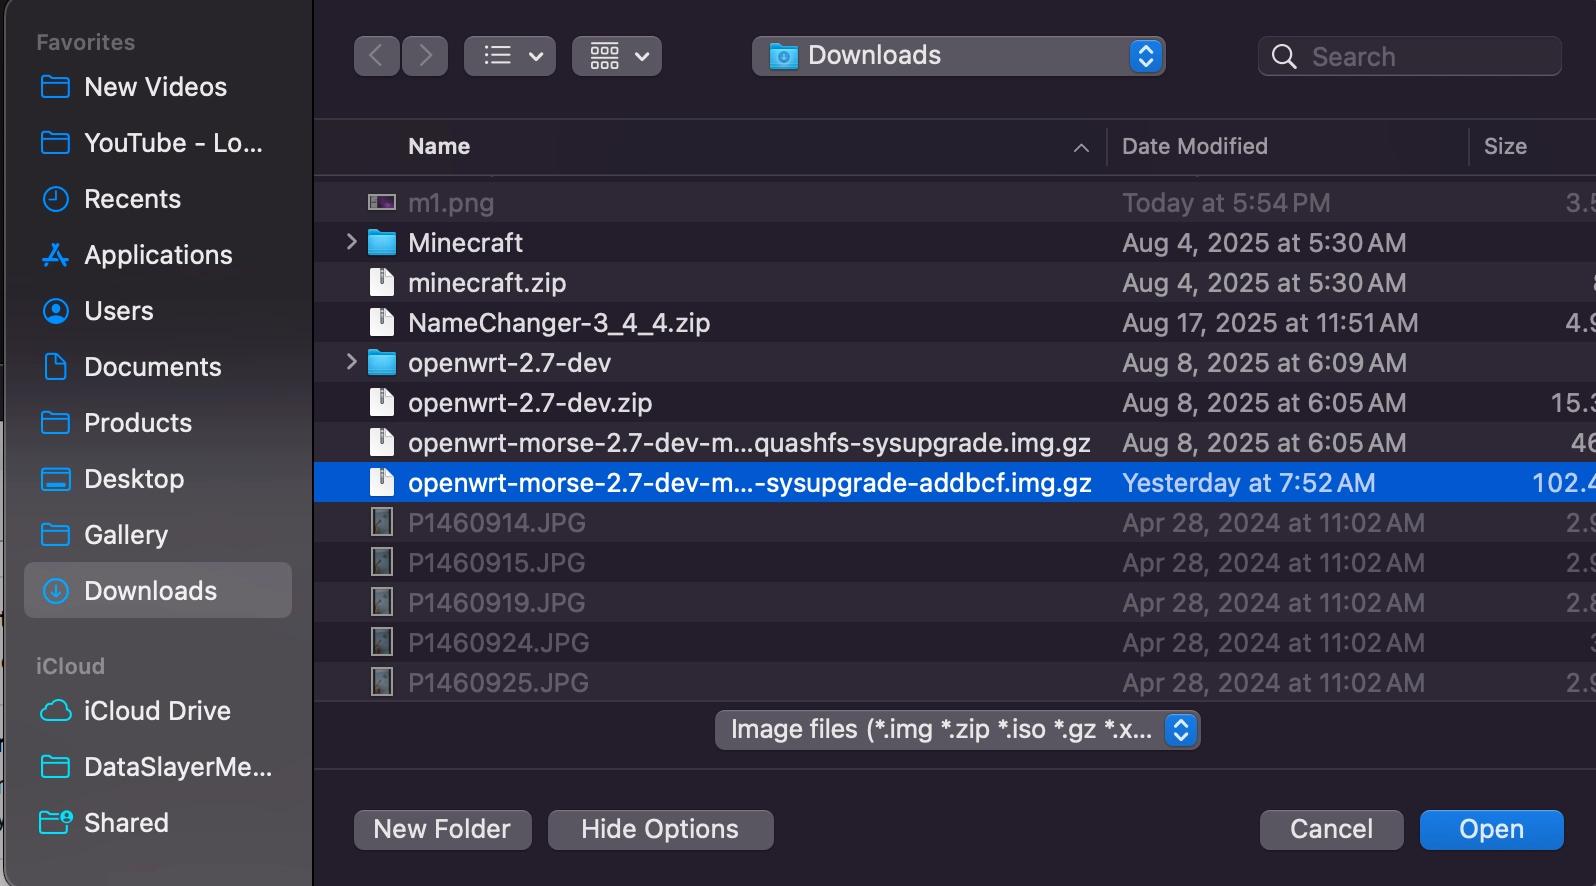
Then you’ll want to download the RPi image flashing software at [https://www.raspberrypi.com/software/], and the custom Morse Micro image we’ll be using for this project, which has been configured to:
- Enable 802.11s (the mesh networking standard)
- Overclocked the transmission power from 21 dbm to 27 dbm (which should increase the range)
No need to decompress/ unzip the download. This file is is a fork of OpenMANET developed by Morse Micro, and if you’d like to, you can buy them a coffee here.
Every node has exactly the same , installed through the SD card, and then there’s a different software configuration for gate and point nodes. I’ll cover each of these processes in their own section.
❖ Firmware:
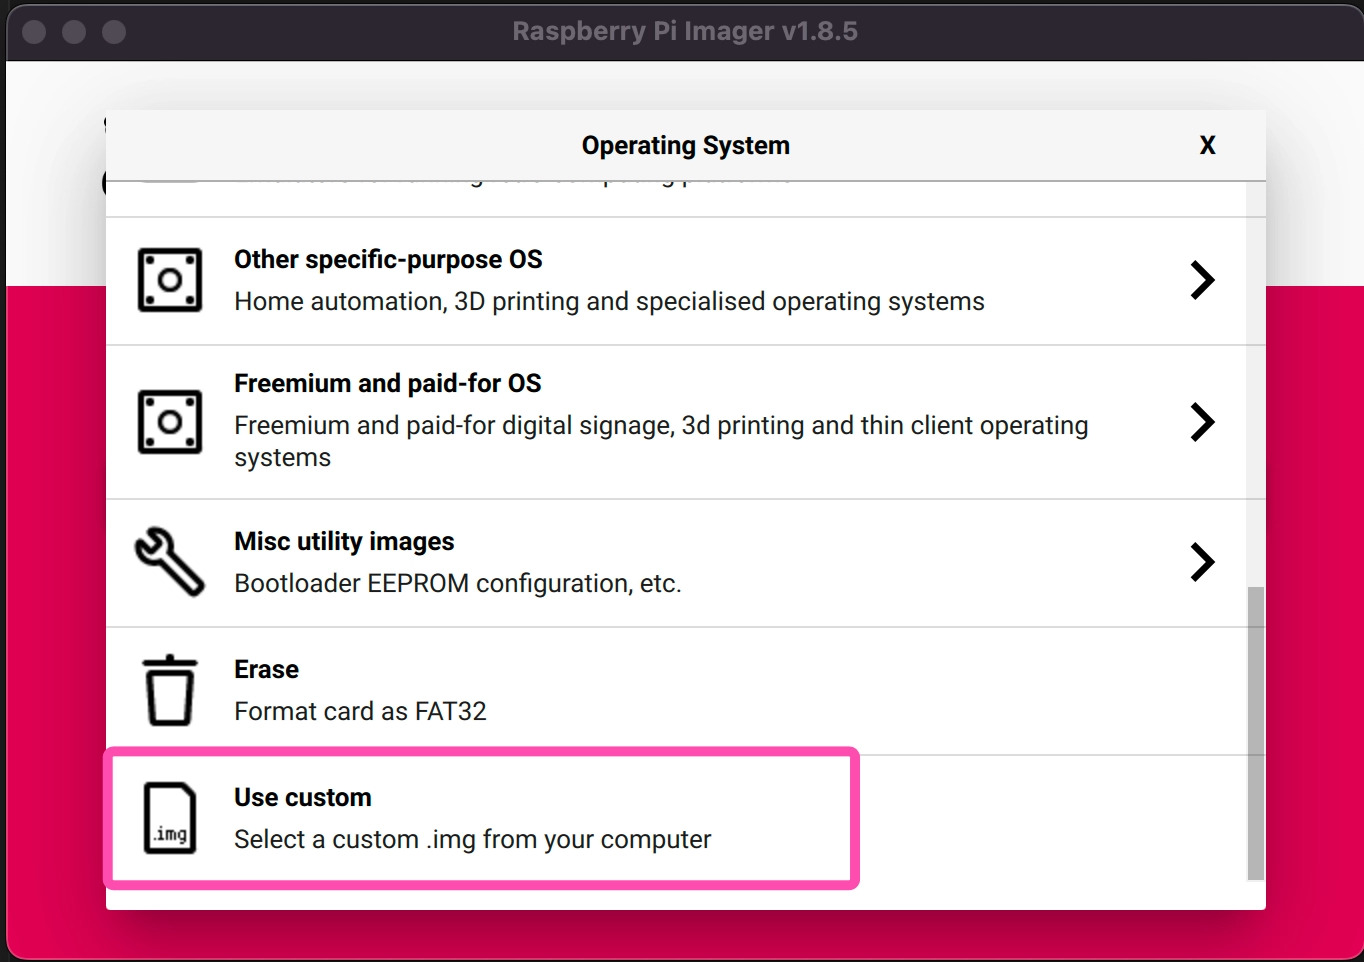
Plug the SD card into your computer and open up the RPi image flashing software, select the “Use Custom” option, and then go select the Morse Micro image you just downloaded.
Finish configuring the SD card, eject it, and slide it into the RPi (on the underside of the circuit board, opposite the ethernet port).
Now you can turn on the RPi for the first time, MAKING SURE THE ANTENNA IS CONNECTED, and press the white ‘boot’ button on the UPS hat.
Connect the RPi to your computer with the ethernet cord and visit this IP address in your browser (you may need to turn off your WiFi):
10.42.0.1
❖ Establishing a Gate Node:
That’s the baseline IP address for the Morse Micro configurator for every node, but once you configure your first gate it will gain a new address and create a sub-network for all of the other point nodes on the network.
Until you’ve assigned new information to the node, the username and password for the LuCI login will both be:
root
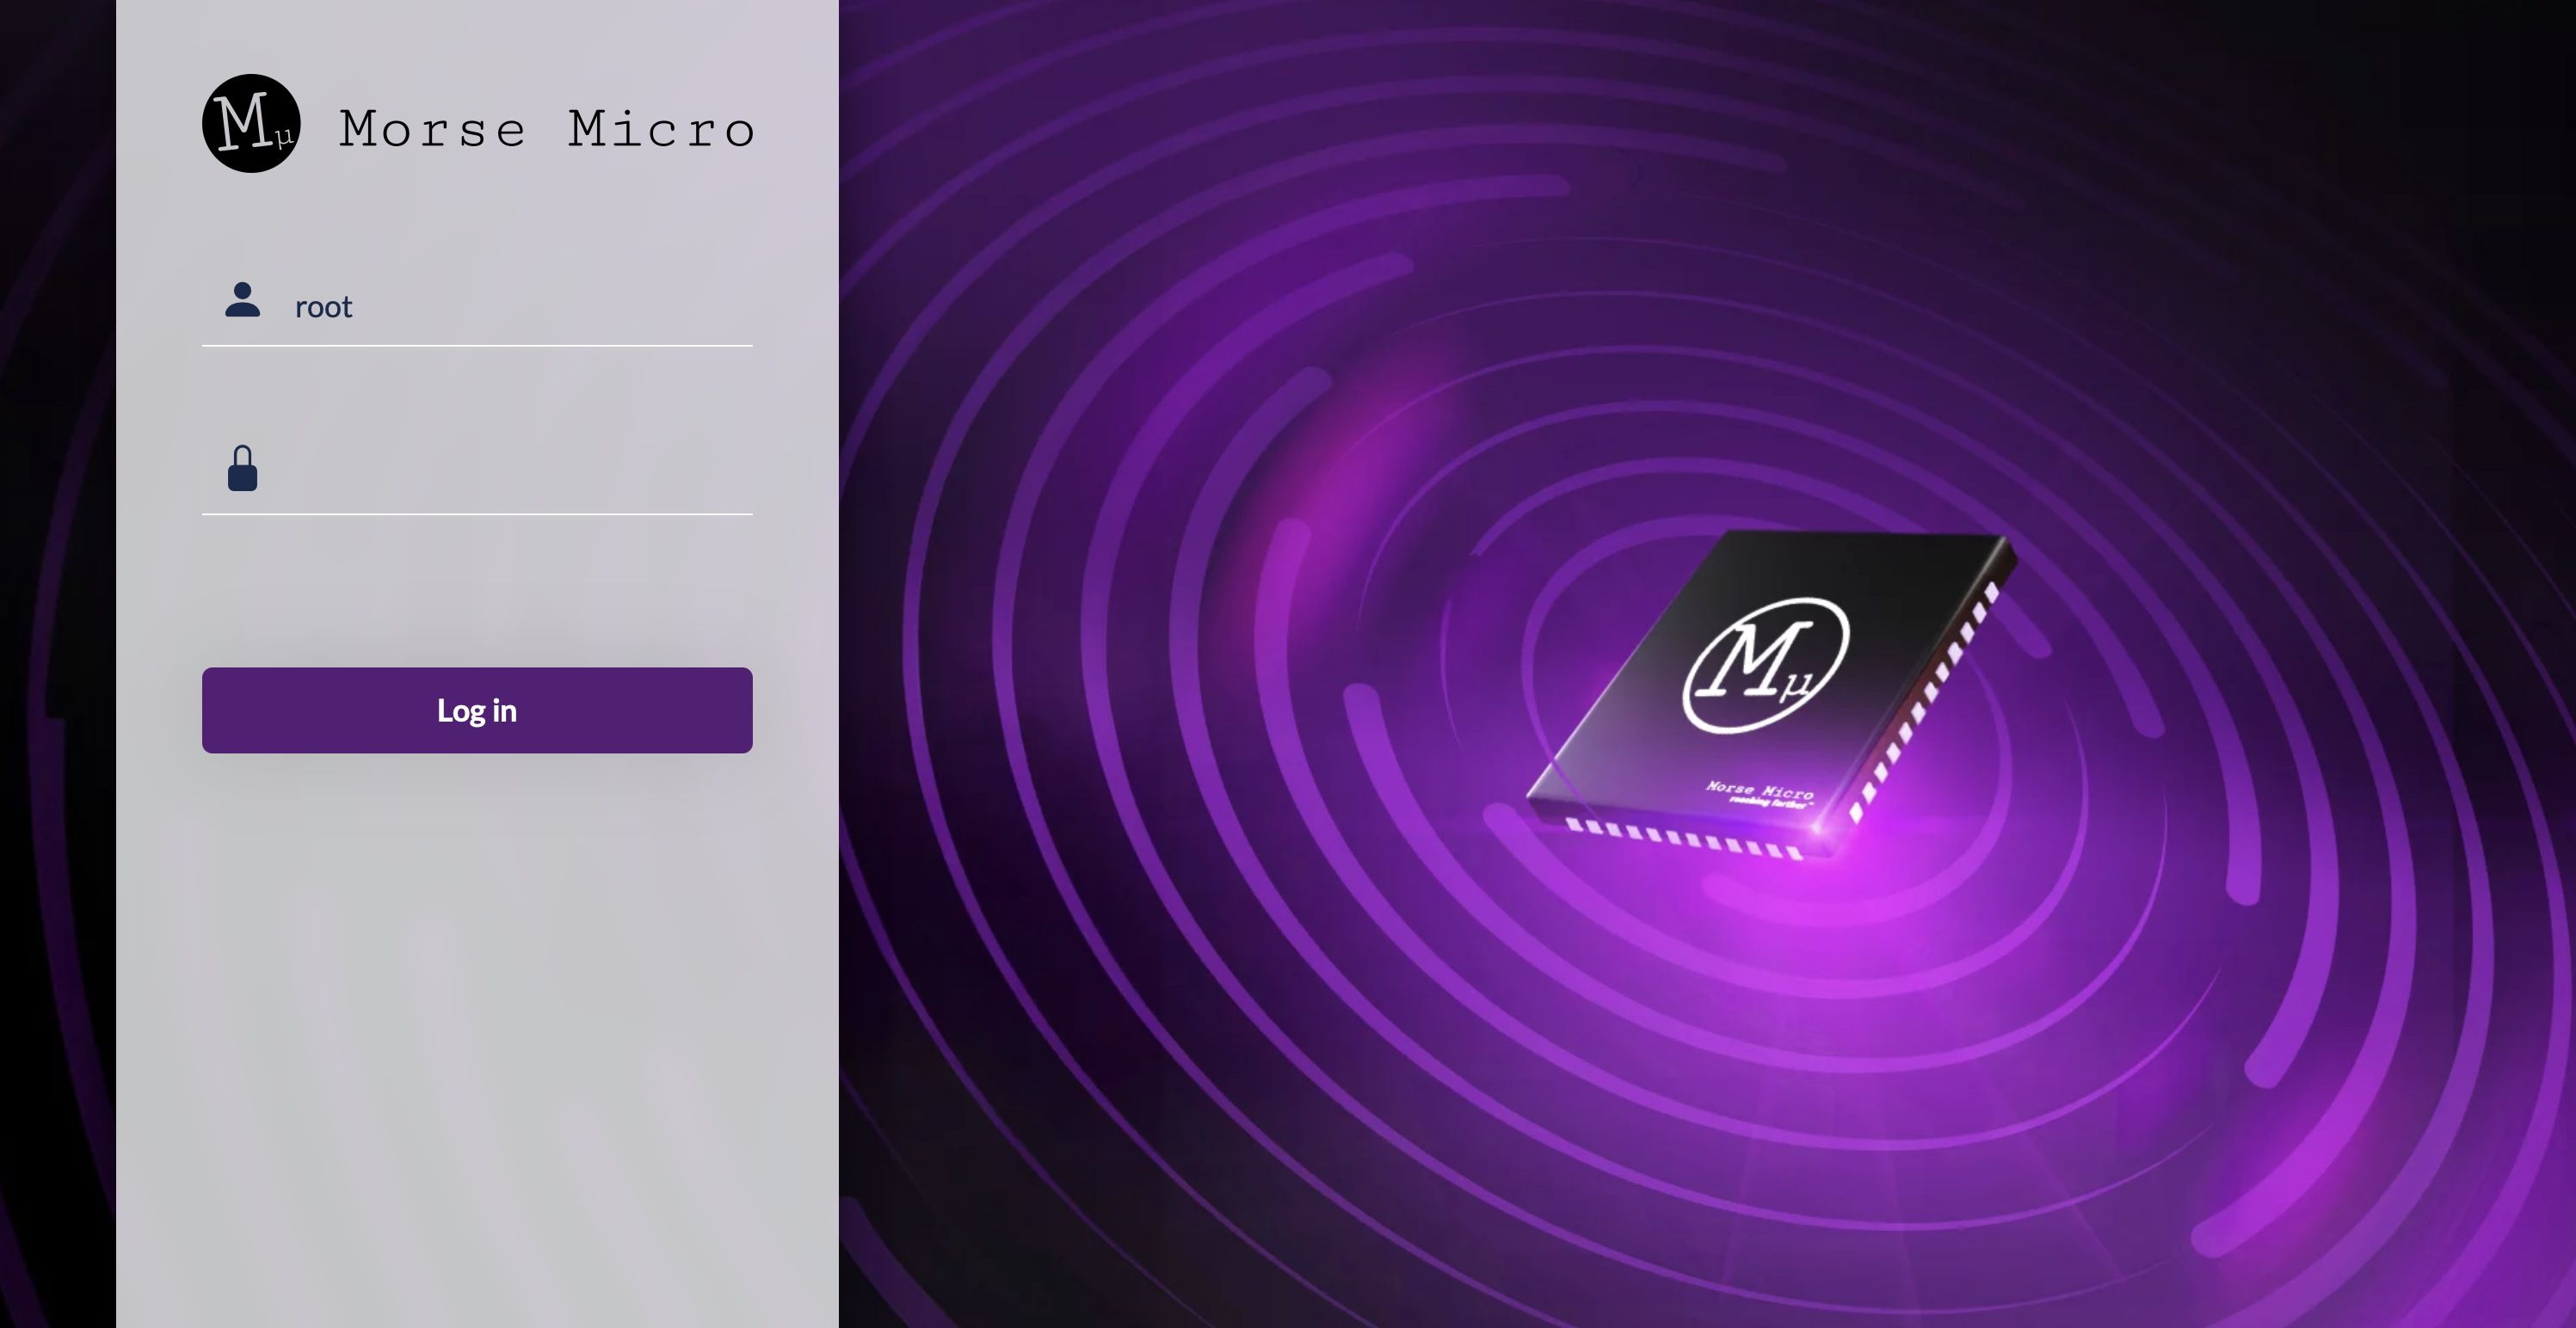
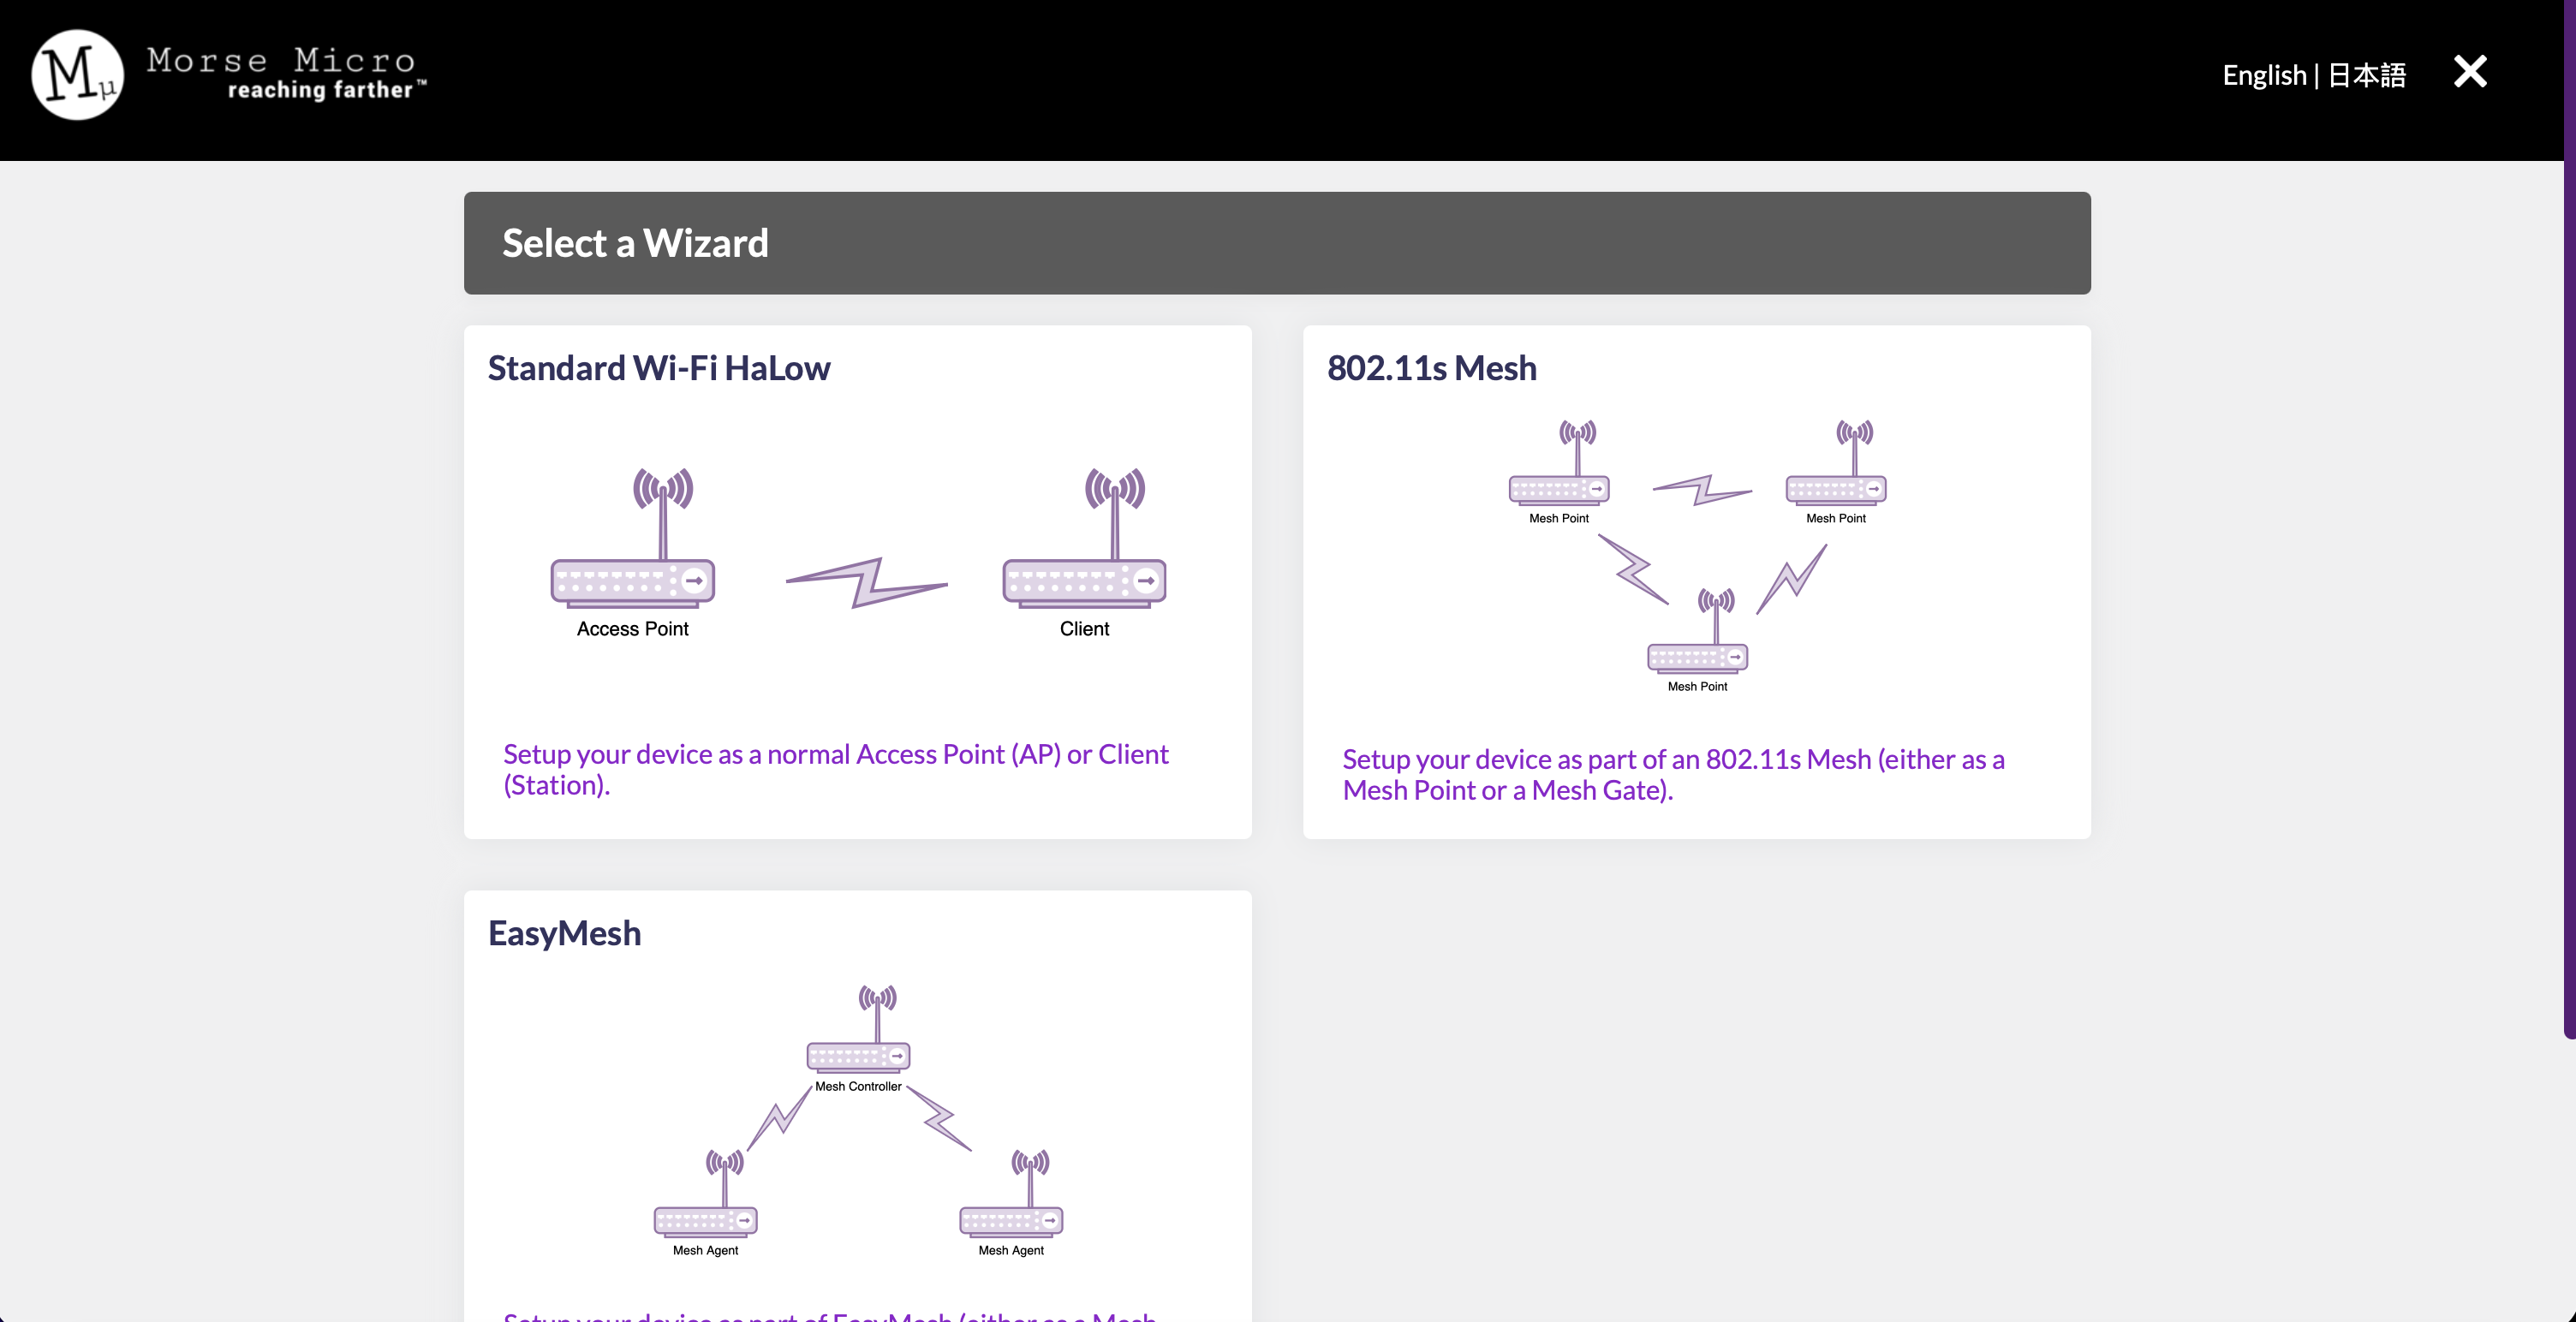
Once you log in to a newly flashed node, you will go straight to the configuration wizard. Select the ‘802.11s Mesh’ option.
Here you will name the node, and give it the new password you will use to access the LuCI in the future. I printed my gate node in blue PLA, so I used the exceptionally creative:
newt-blue
Psswd:
newtblue1
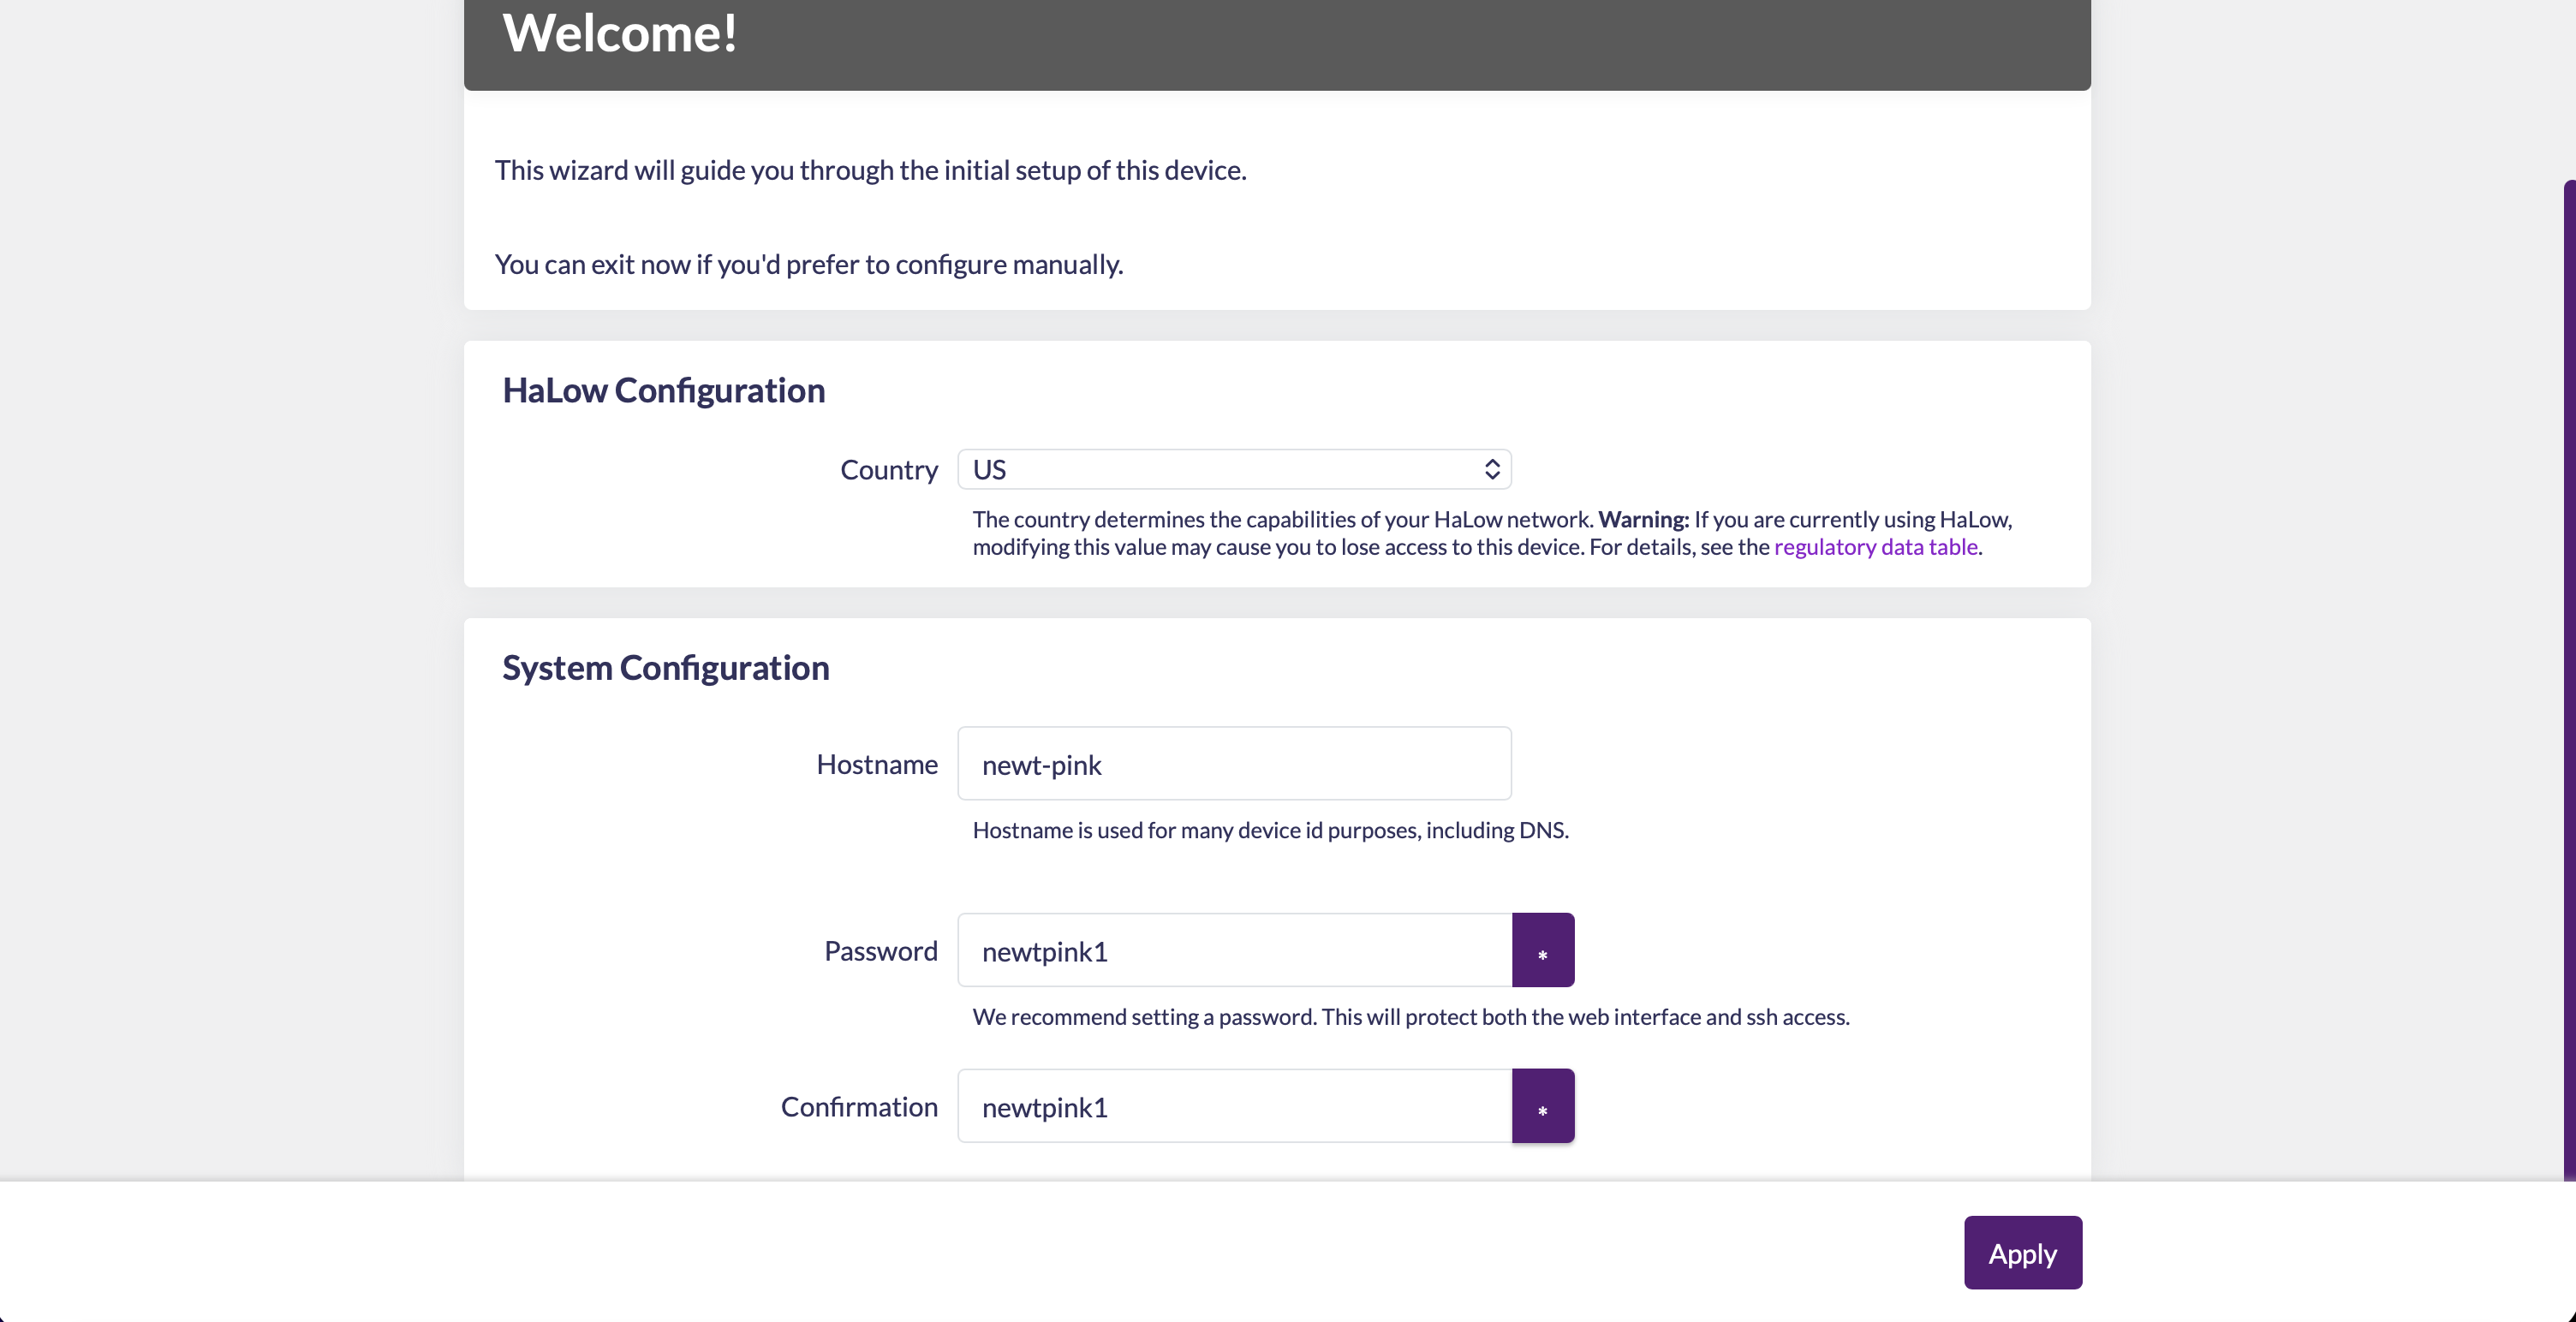
Select the option to create a gate node!

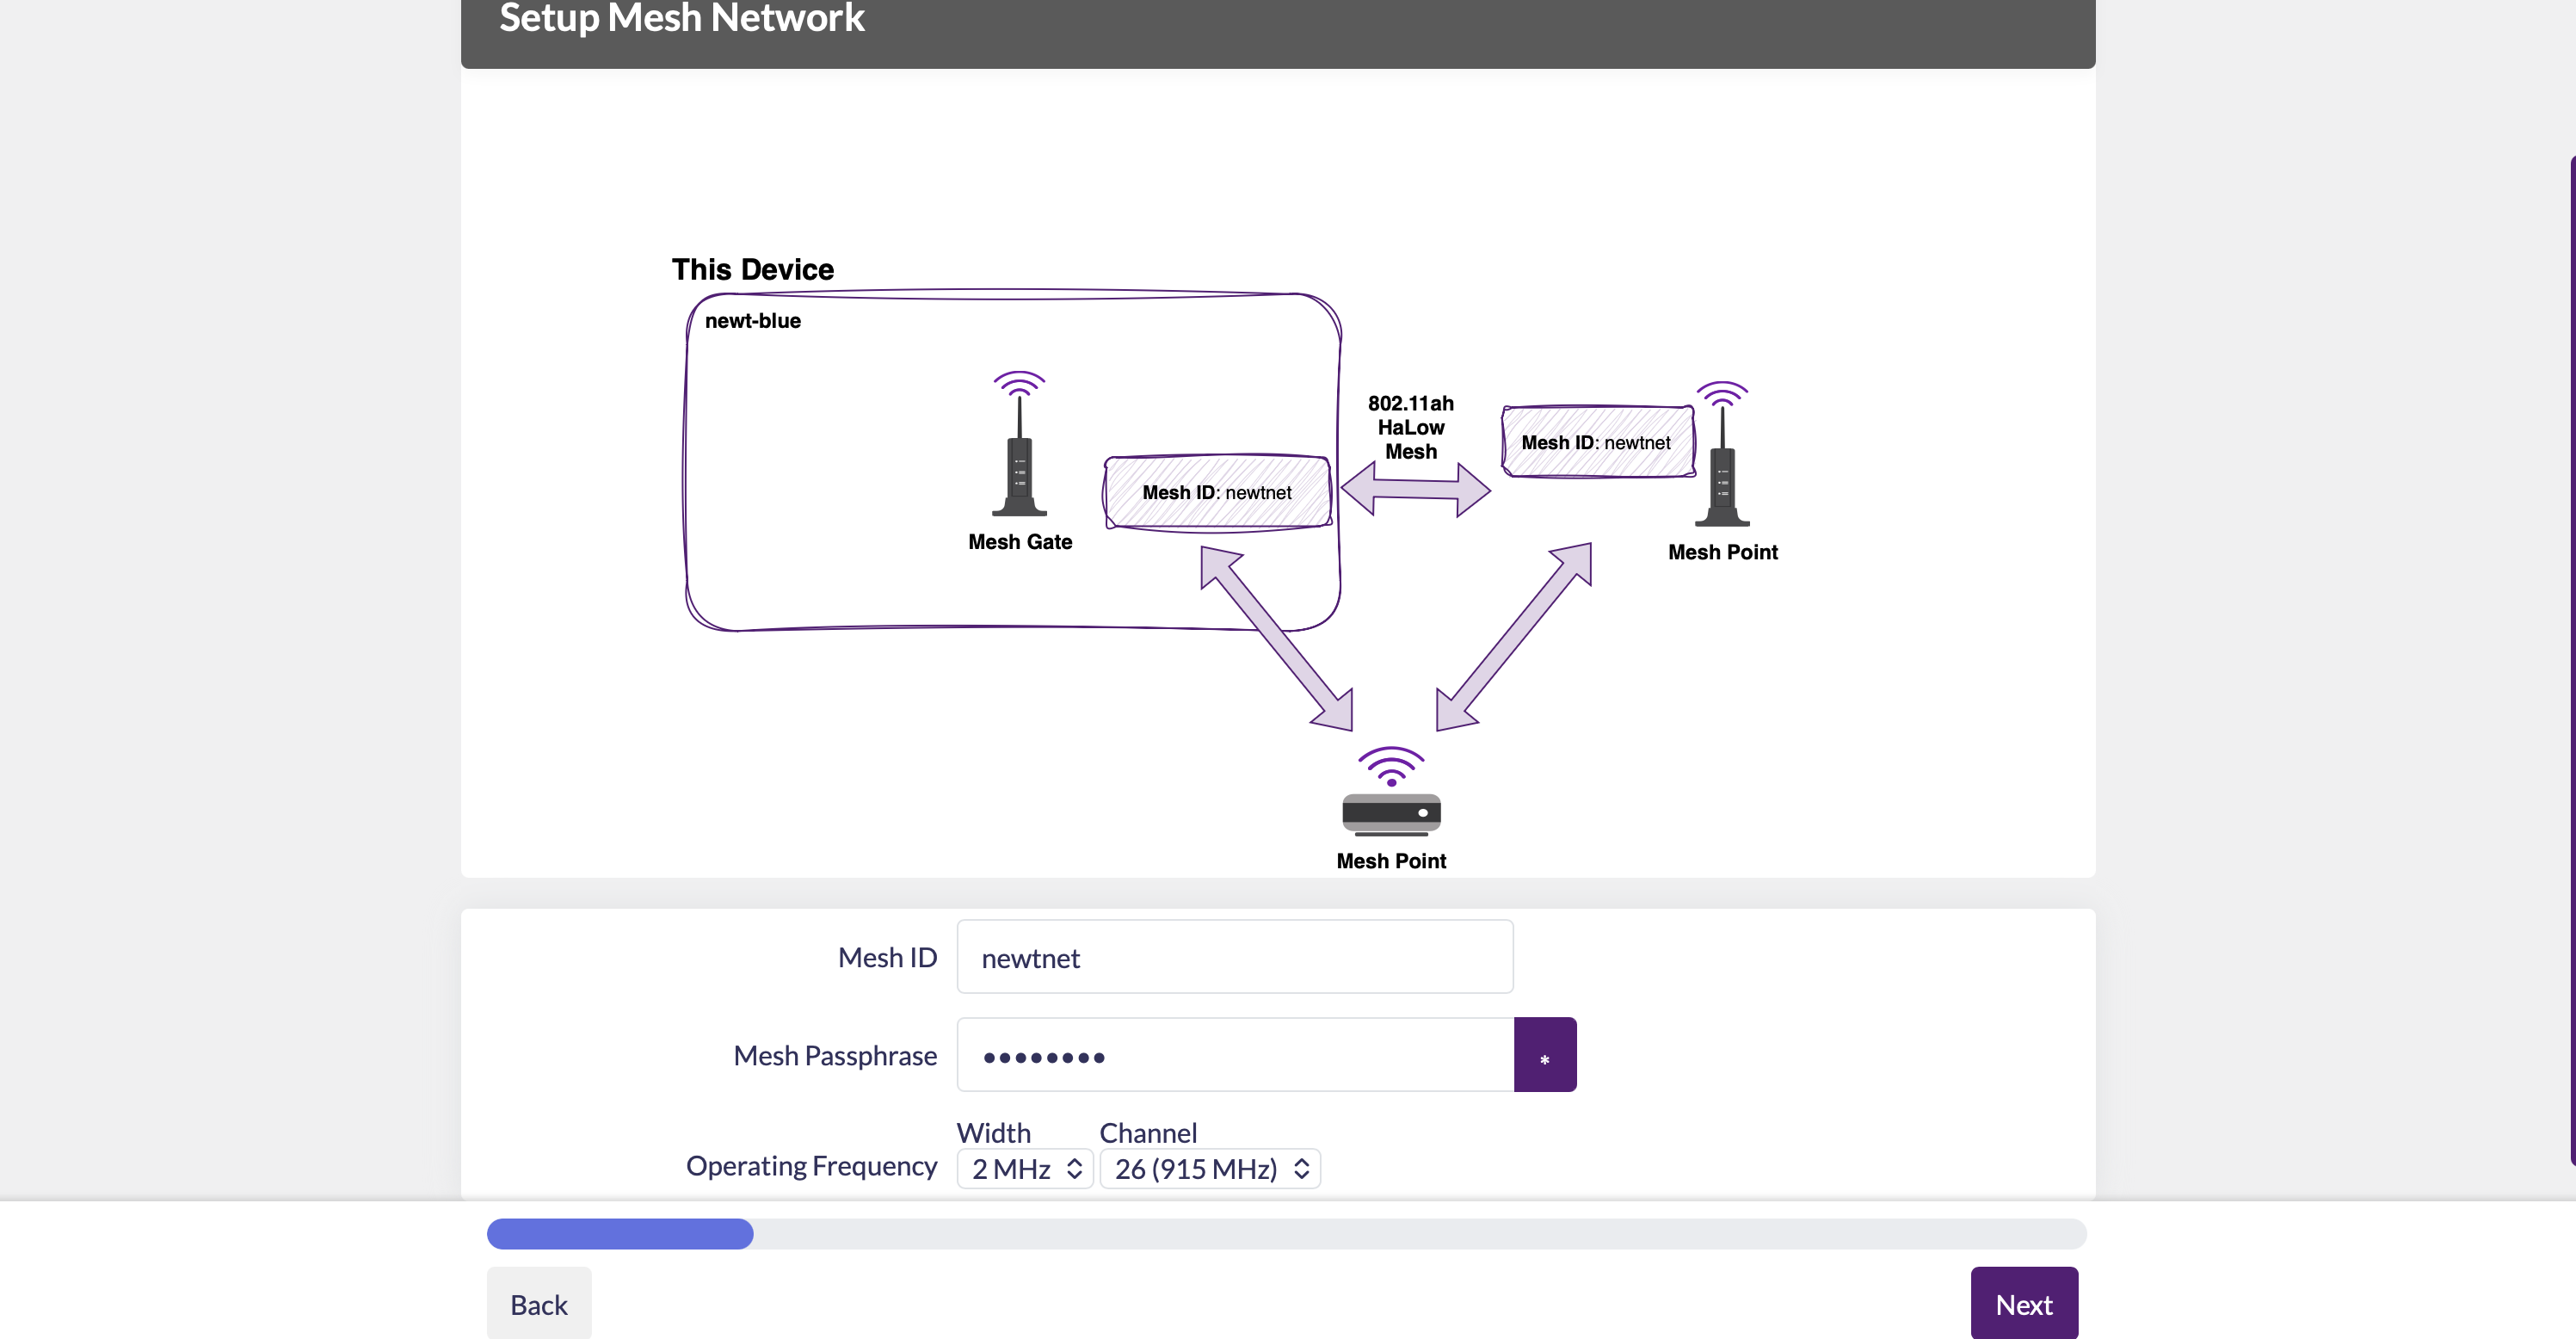
Create a name (mesh ID) and password for your entire mesh network here. You'll also choose the channel and width the network will operate on here. See more about this under Application. I chose:
newtnet
Psswd:
newtnet1
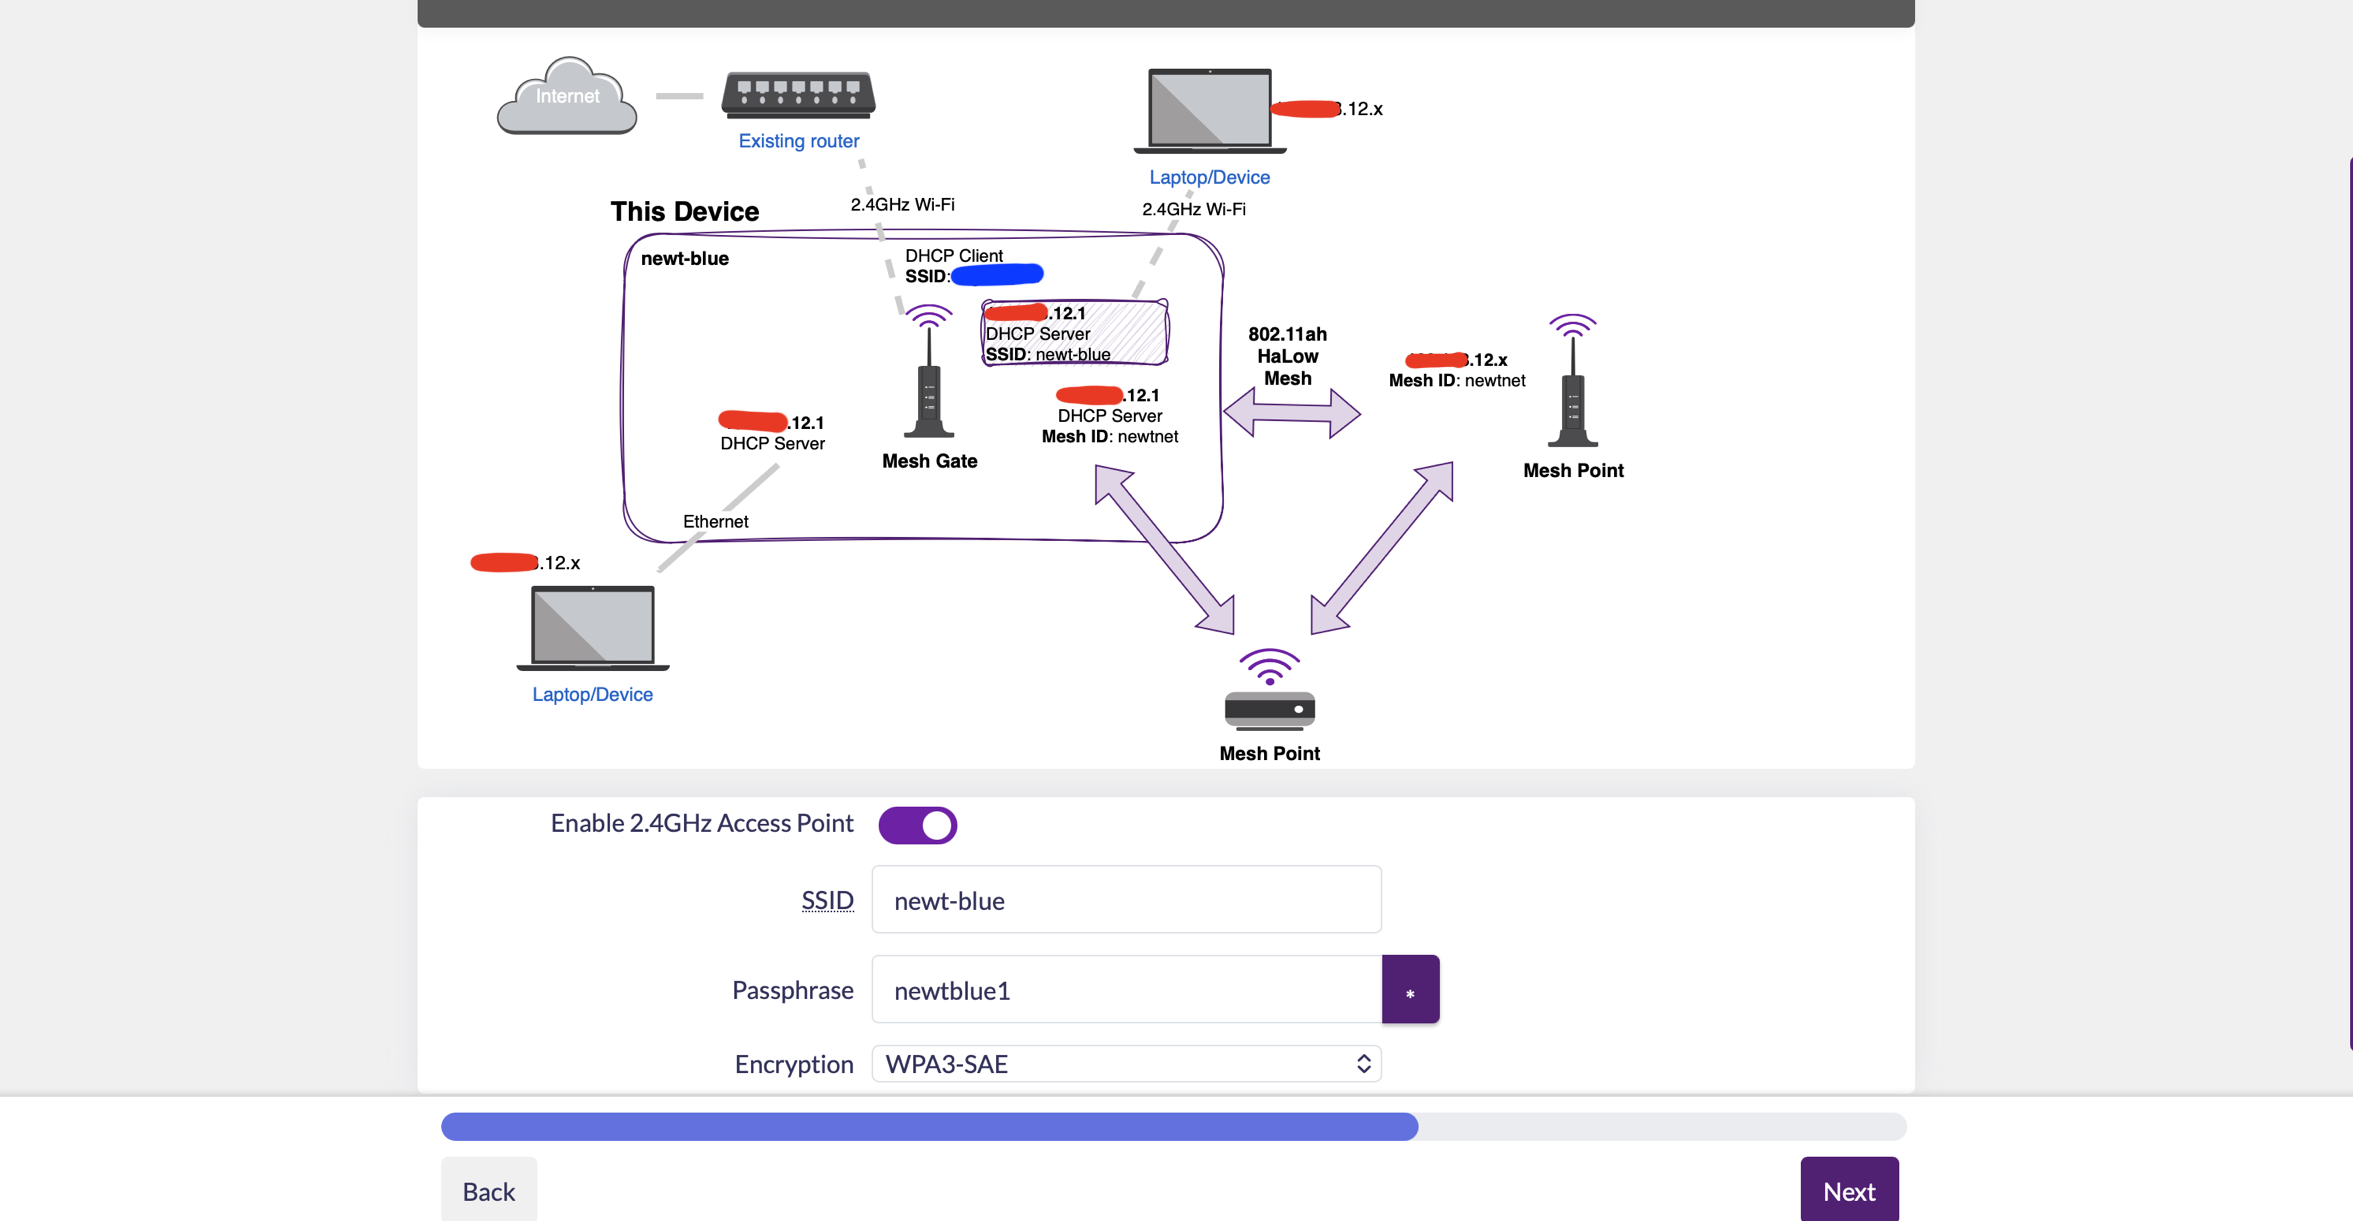
Choose how this gate node will be used--will it solely forward information over an ethernet cord, or more likely, will it be connecting to the outside world over a 2.4 GHz WiFi network? If it will ever be a network, go ahead and give it the local network credentials (you can add more later), represented with blue redactions.
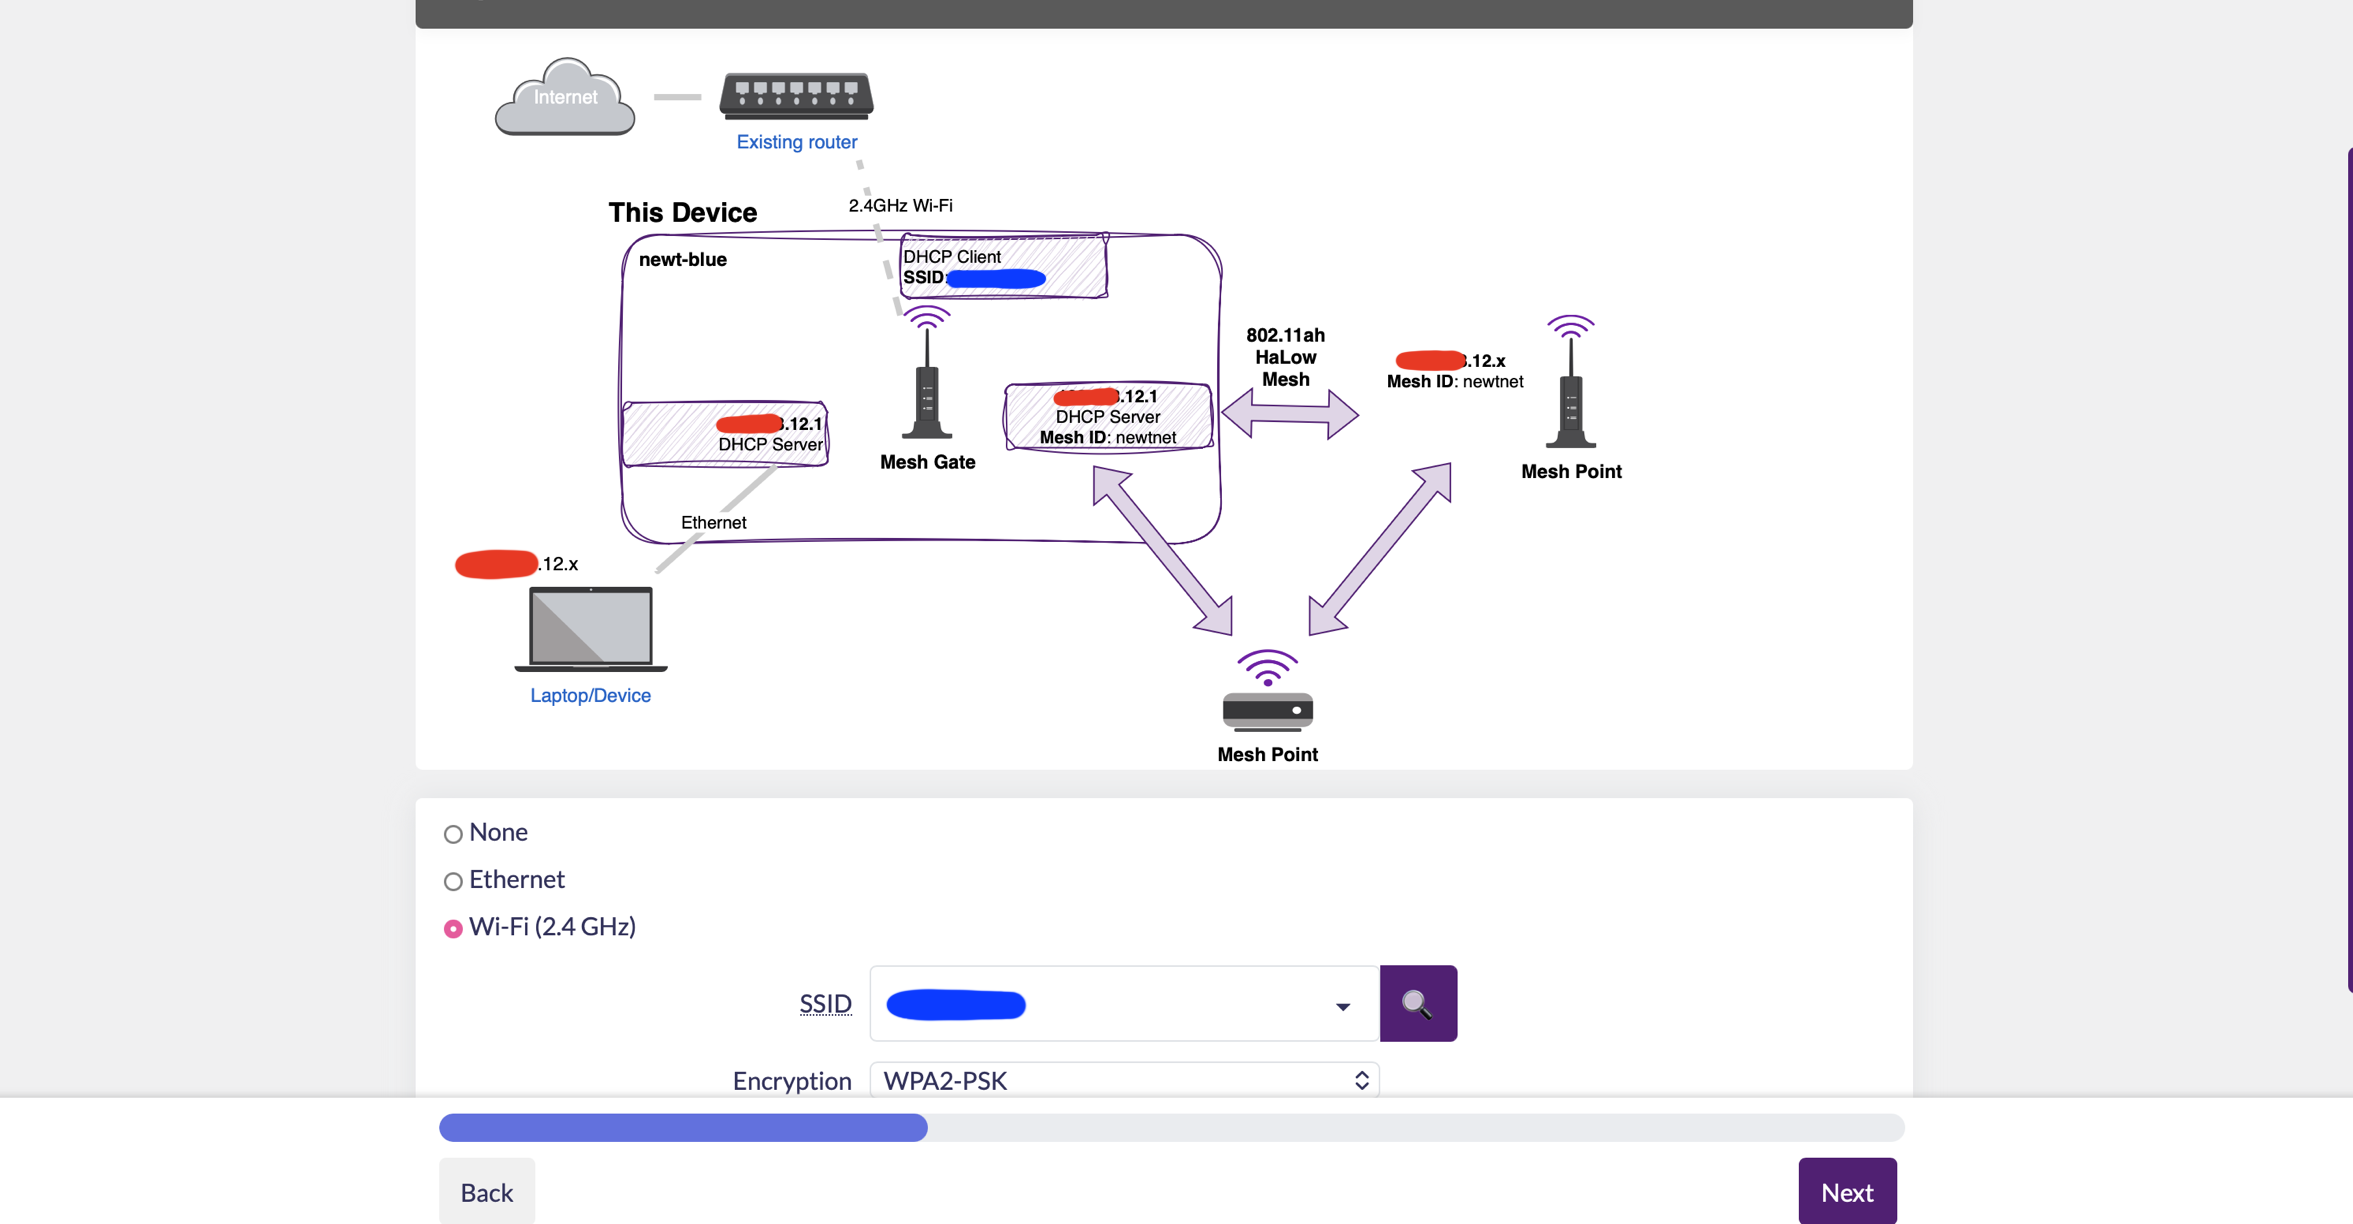
This will immediately populate the new IP address for the gate node, represented with red redactions, as well as the new for the newt-net, the ".12.x" at the end of the address. For this application, we don't need to enable the HaLow access point on the next page.

At this point you get to create the name and password for the 2.4 GHz access point this gate will project. For ease of testing, I selected yes and used the same name and passward that I gave the node:
newt-blue
Psswd:
newtblue1
Be thoughtful about this choice however, as there may be important reasons for why you don't want your gate node, which is the lifeline of the network, projecting it's own WiFi network which gives away it's position. You should also absolutely set a different password for logging into the access point then the one that will allow anyone on that network access to the LuCI.
After you configure and apply your changes, the node will reset to it's new IP address and the LuCI page will reload. If you lose connection at this point, on a Mac you can go to System Settings -> Network -> Ethernet Interface -> Details -> TCP IP. The "Router" IP will be your new LuCI access address.
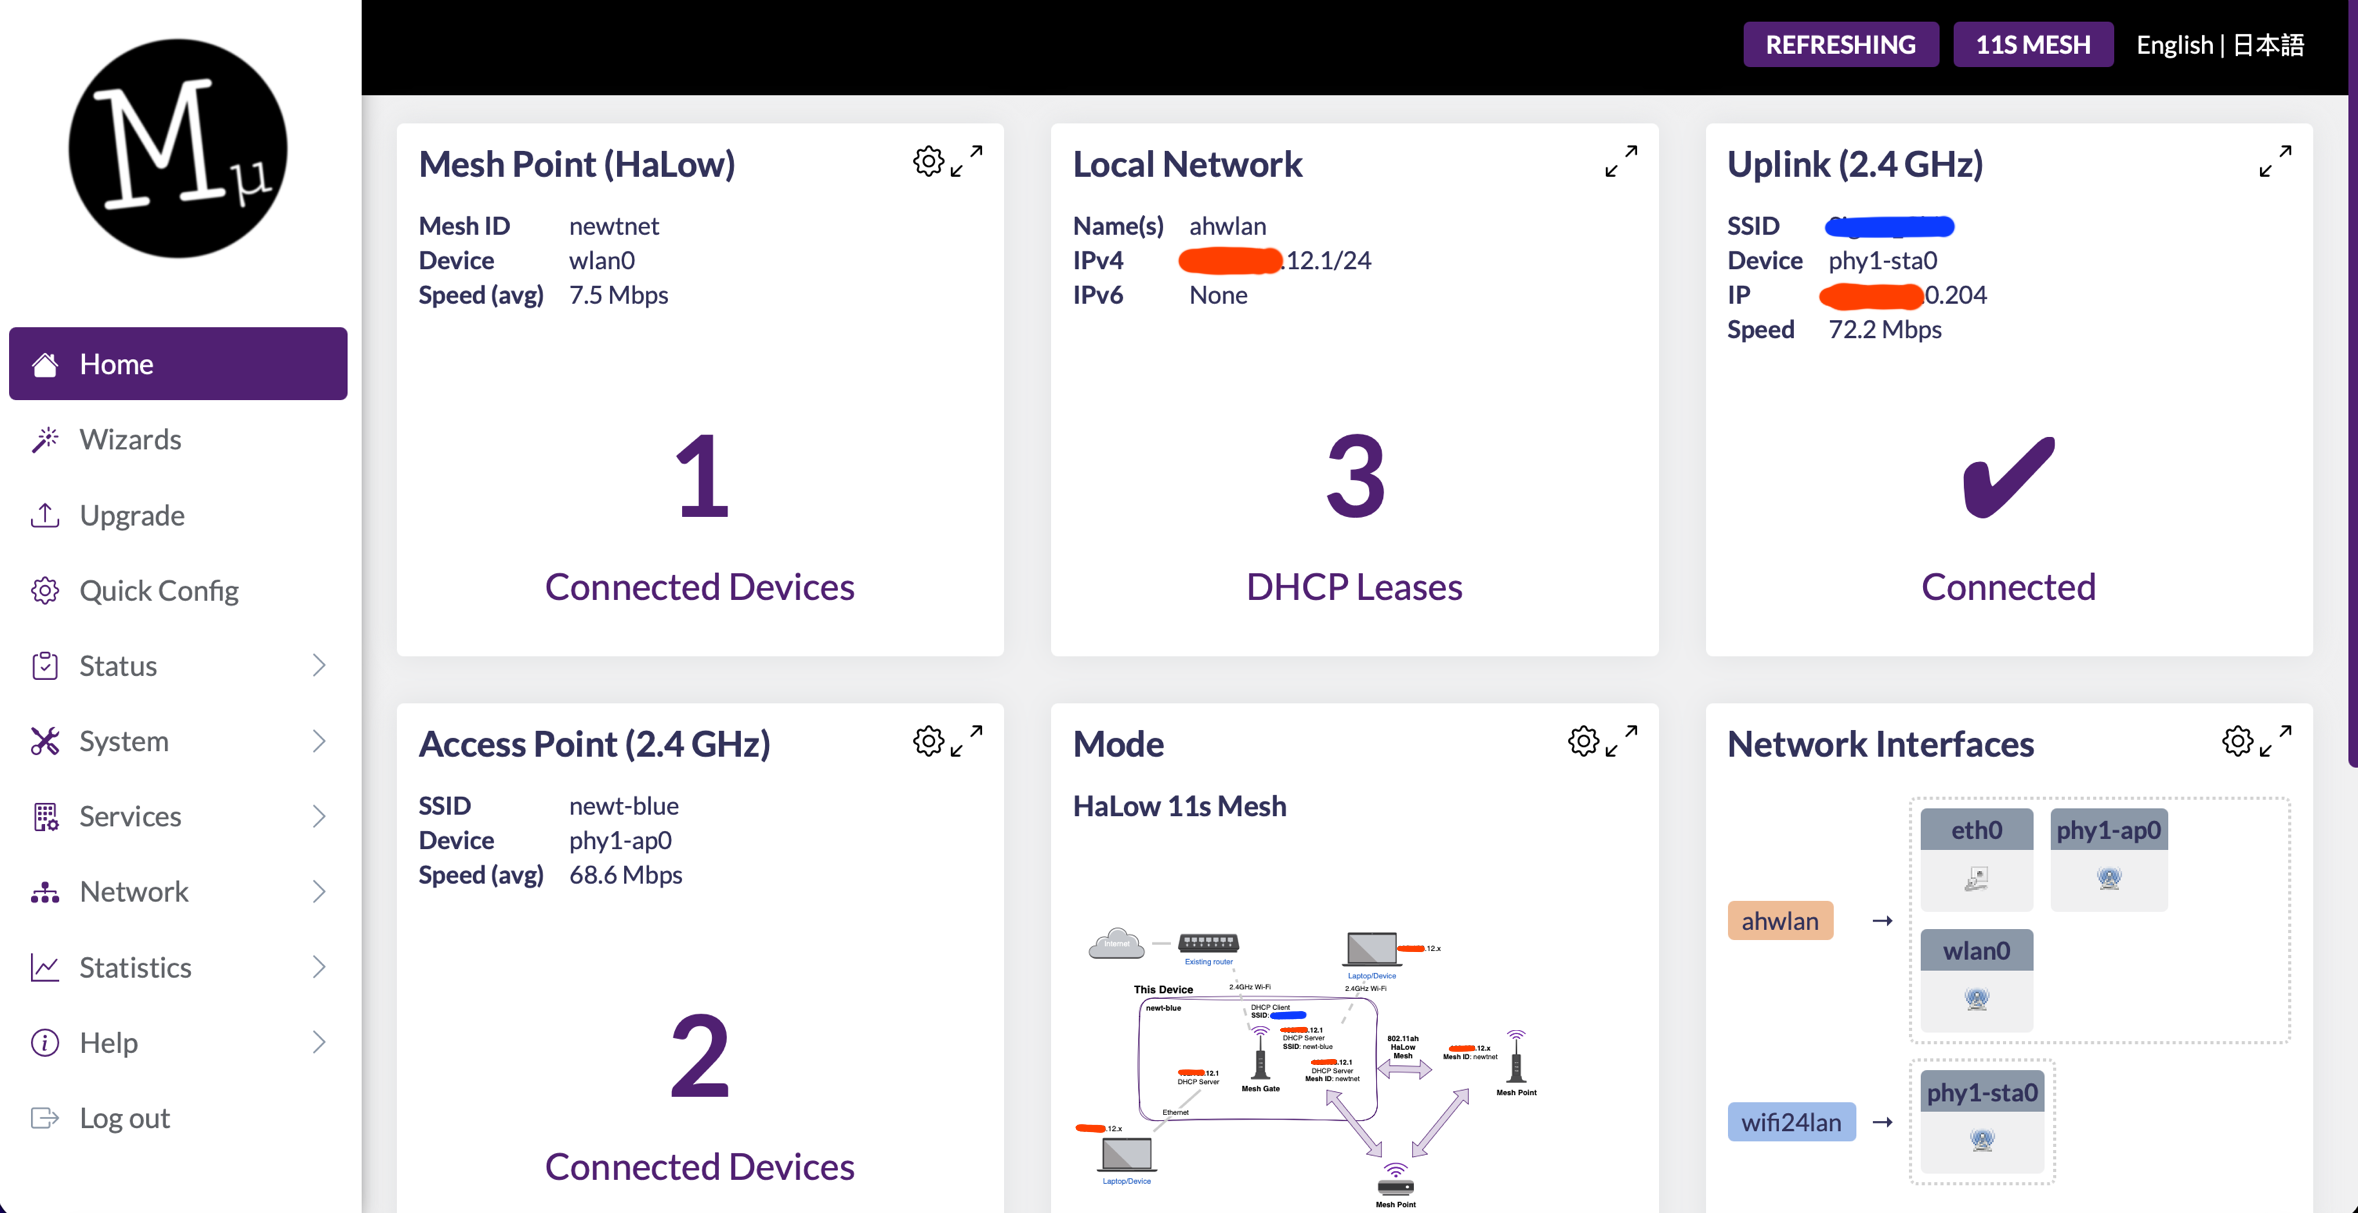
When you log into the new LuCI successfully, you should a home page something like the one below. From left to right, it's telling you
- The number of active nodes on the list
- The number of connected devices it's given a sub-IP address [DHCP Lease] to
- The health of it's uplink to your local network
- The strength of the access point it's broadcasting
Before you can really validate if your gate works however, you'll need to build a point node for it to connect to!
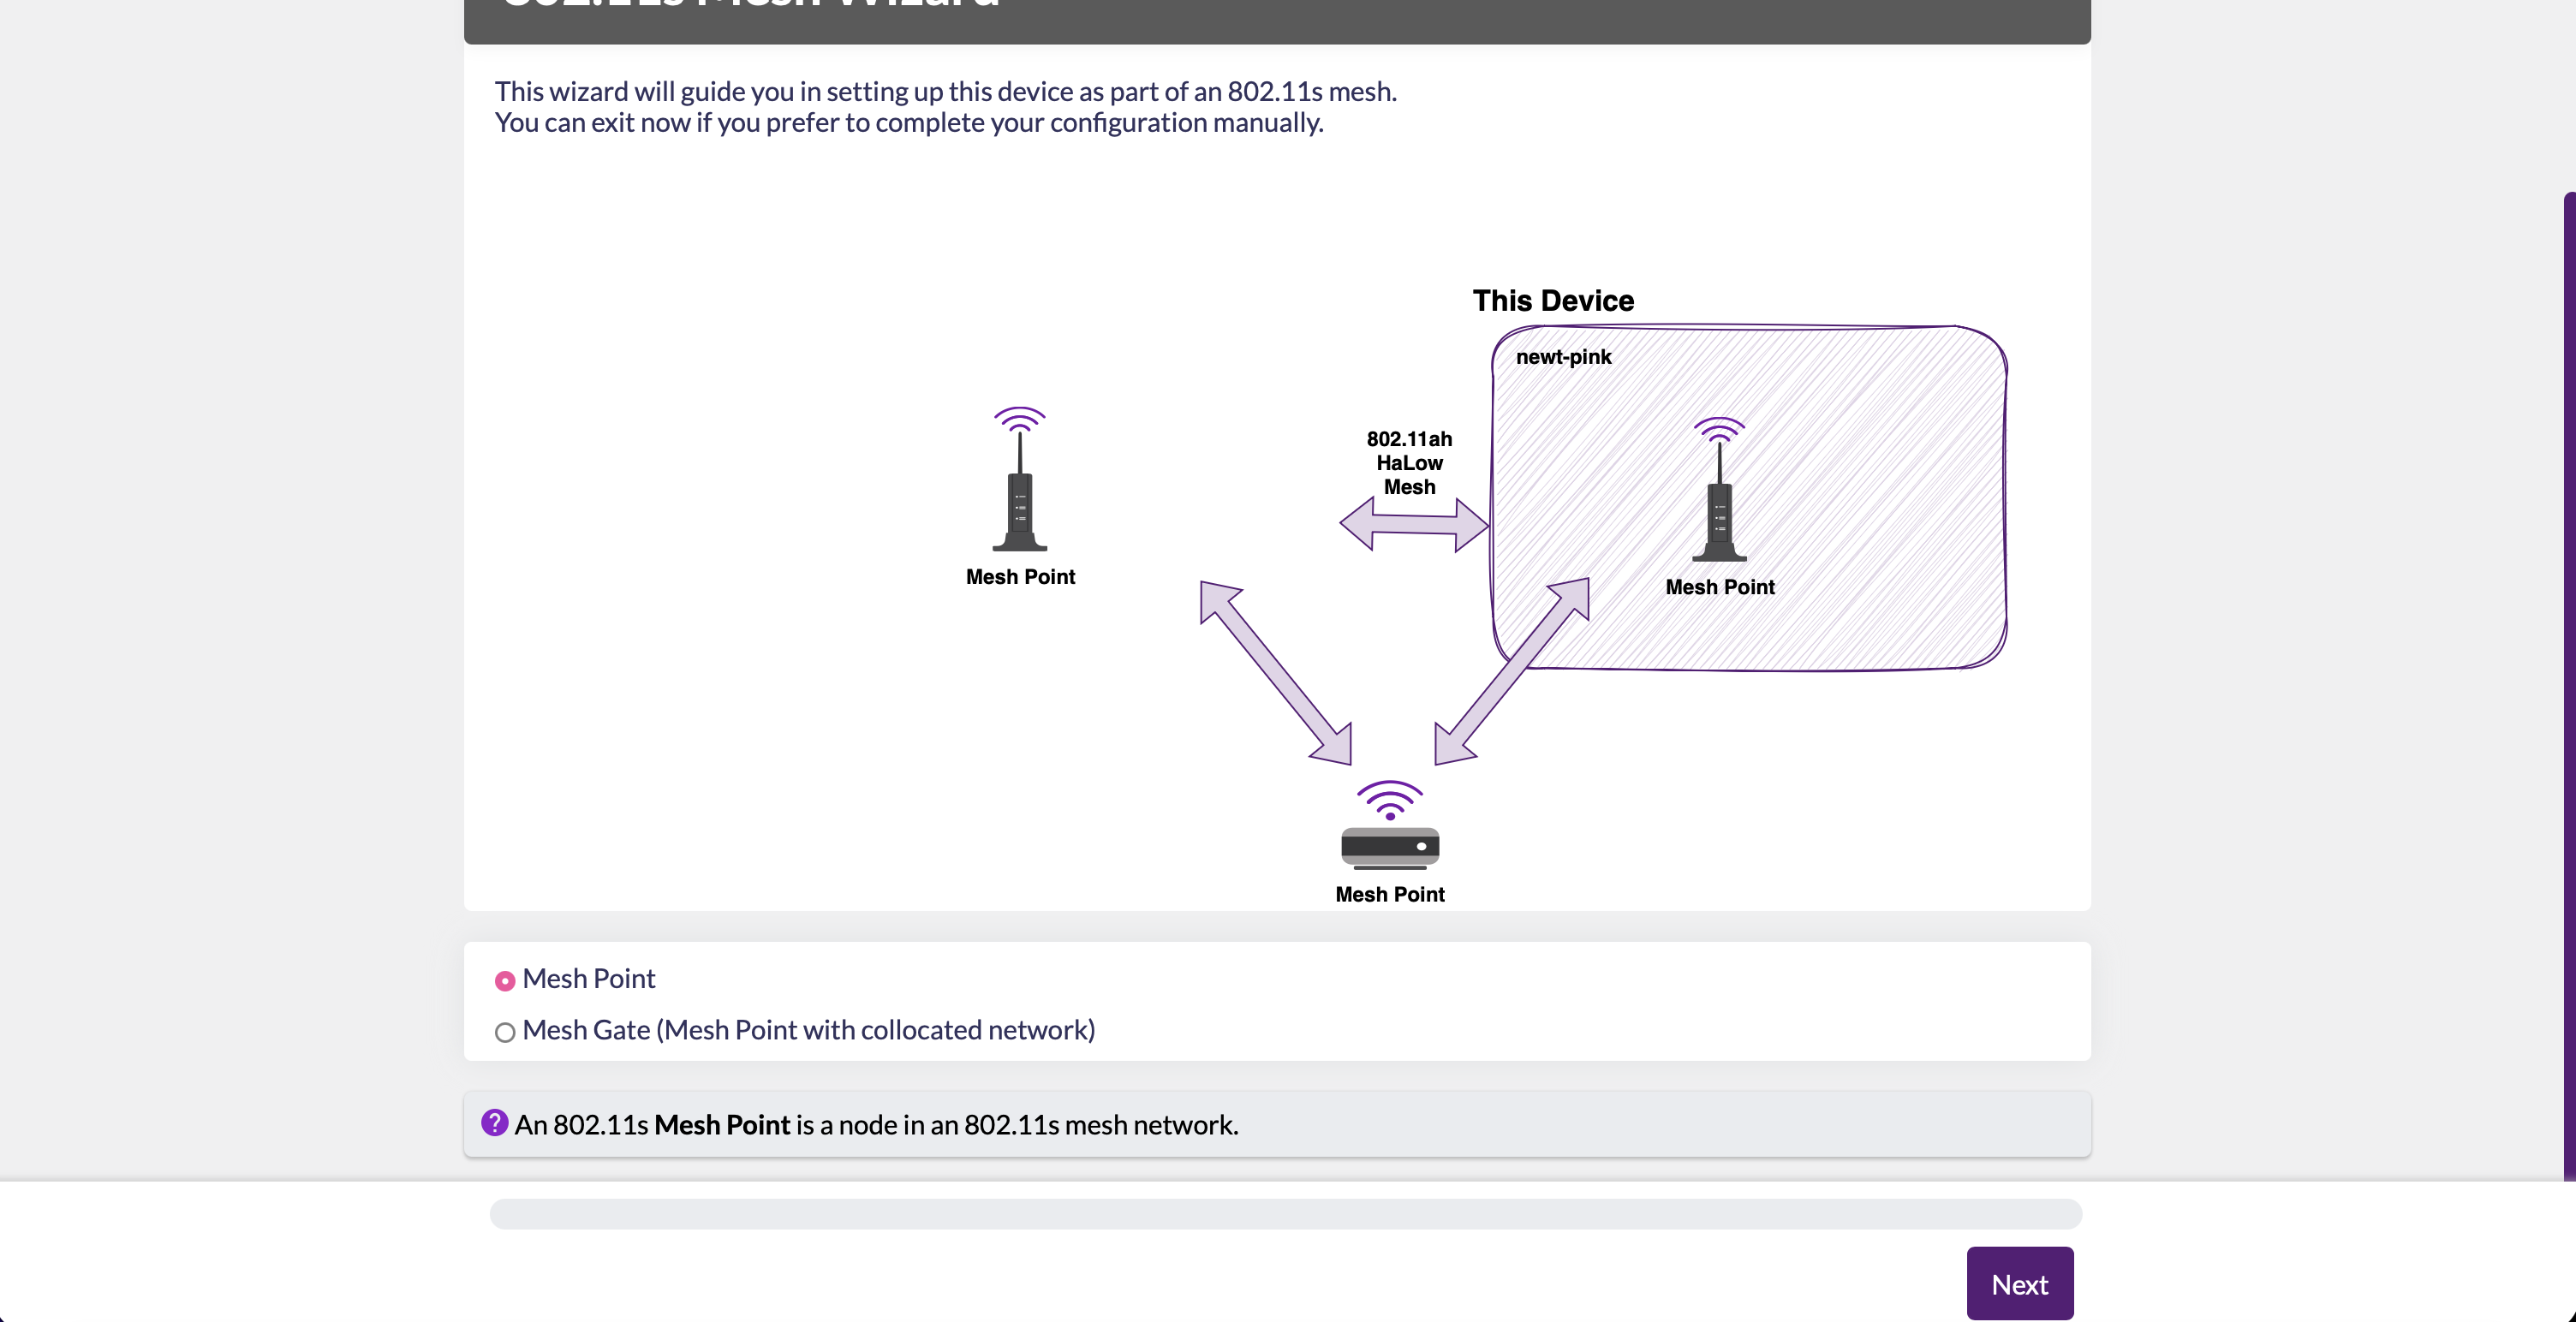
❖ Establishing a Point Node:
Establishing a point node is incredibly similiar to gate! The main set-up difference will be that it gains it's new IP address from a gate node broadcasting on the mesh net, so it will be important to have our newt-blue powered on during configuration.
As before, first you will name the node, and give it the new password you will use to access the LuCI in the future. I printed my point node in pink PLA, so I used:
newt-pink
Psswd:
newtpink1
Select the option to create a point node!
Enter the mesh ID and password for your mesh network here. We're still using:
newtnet
Psswd:
newtnet1
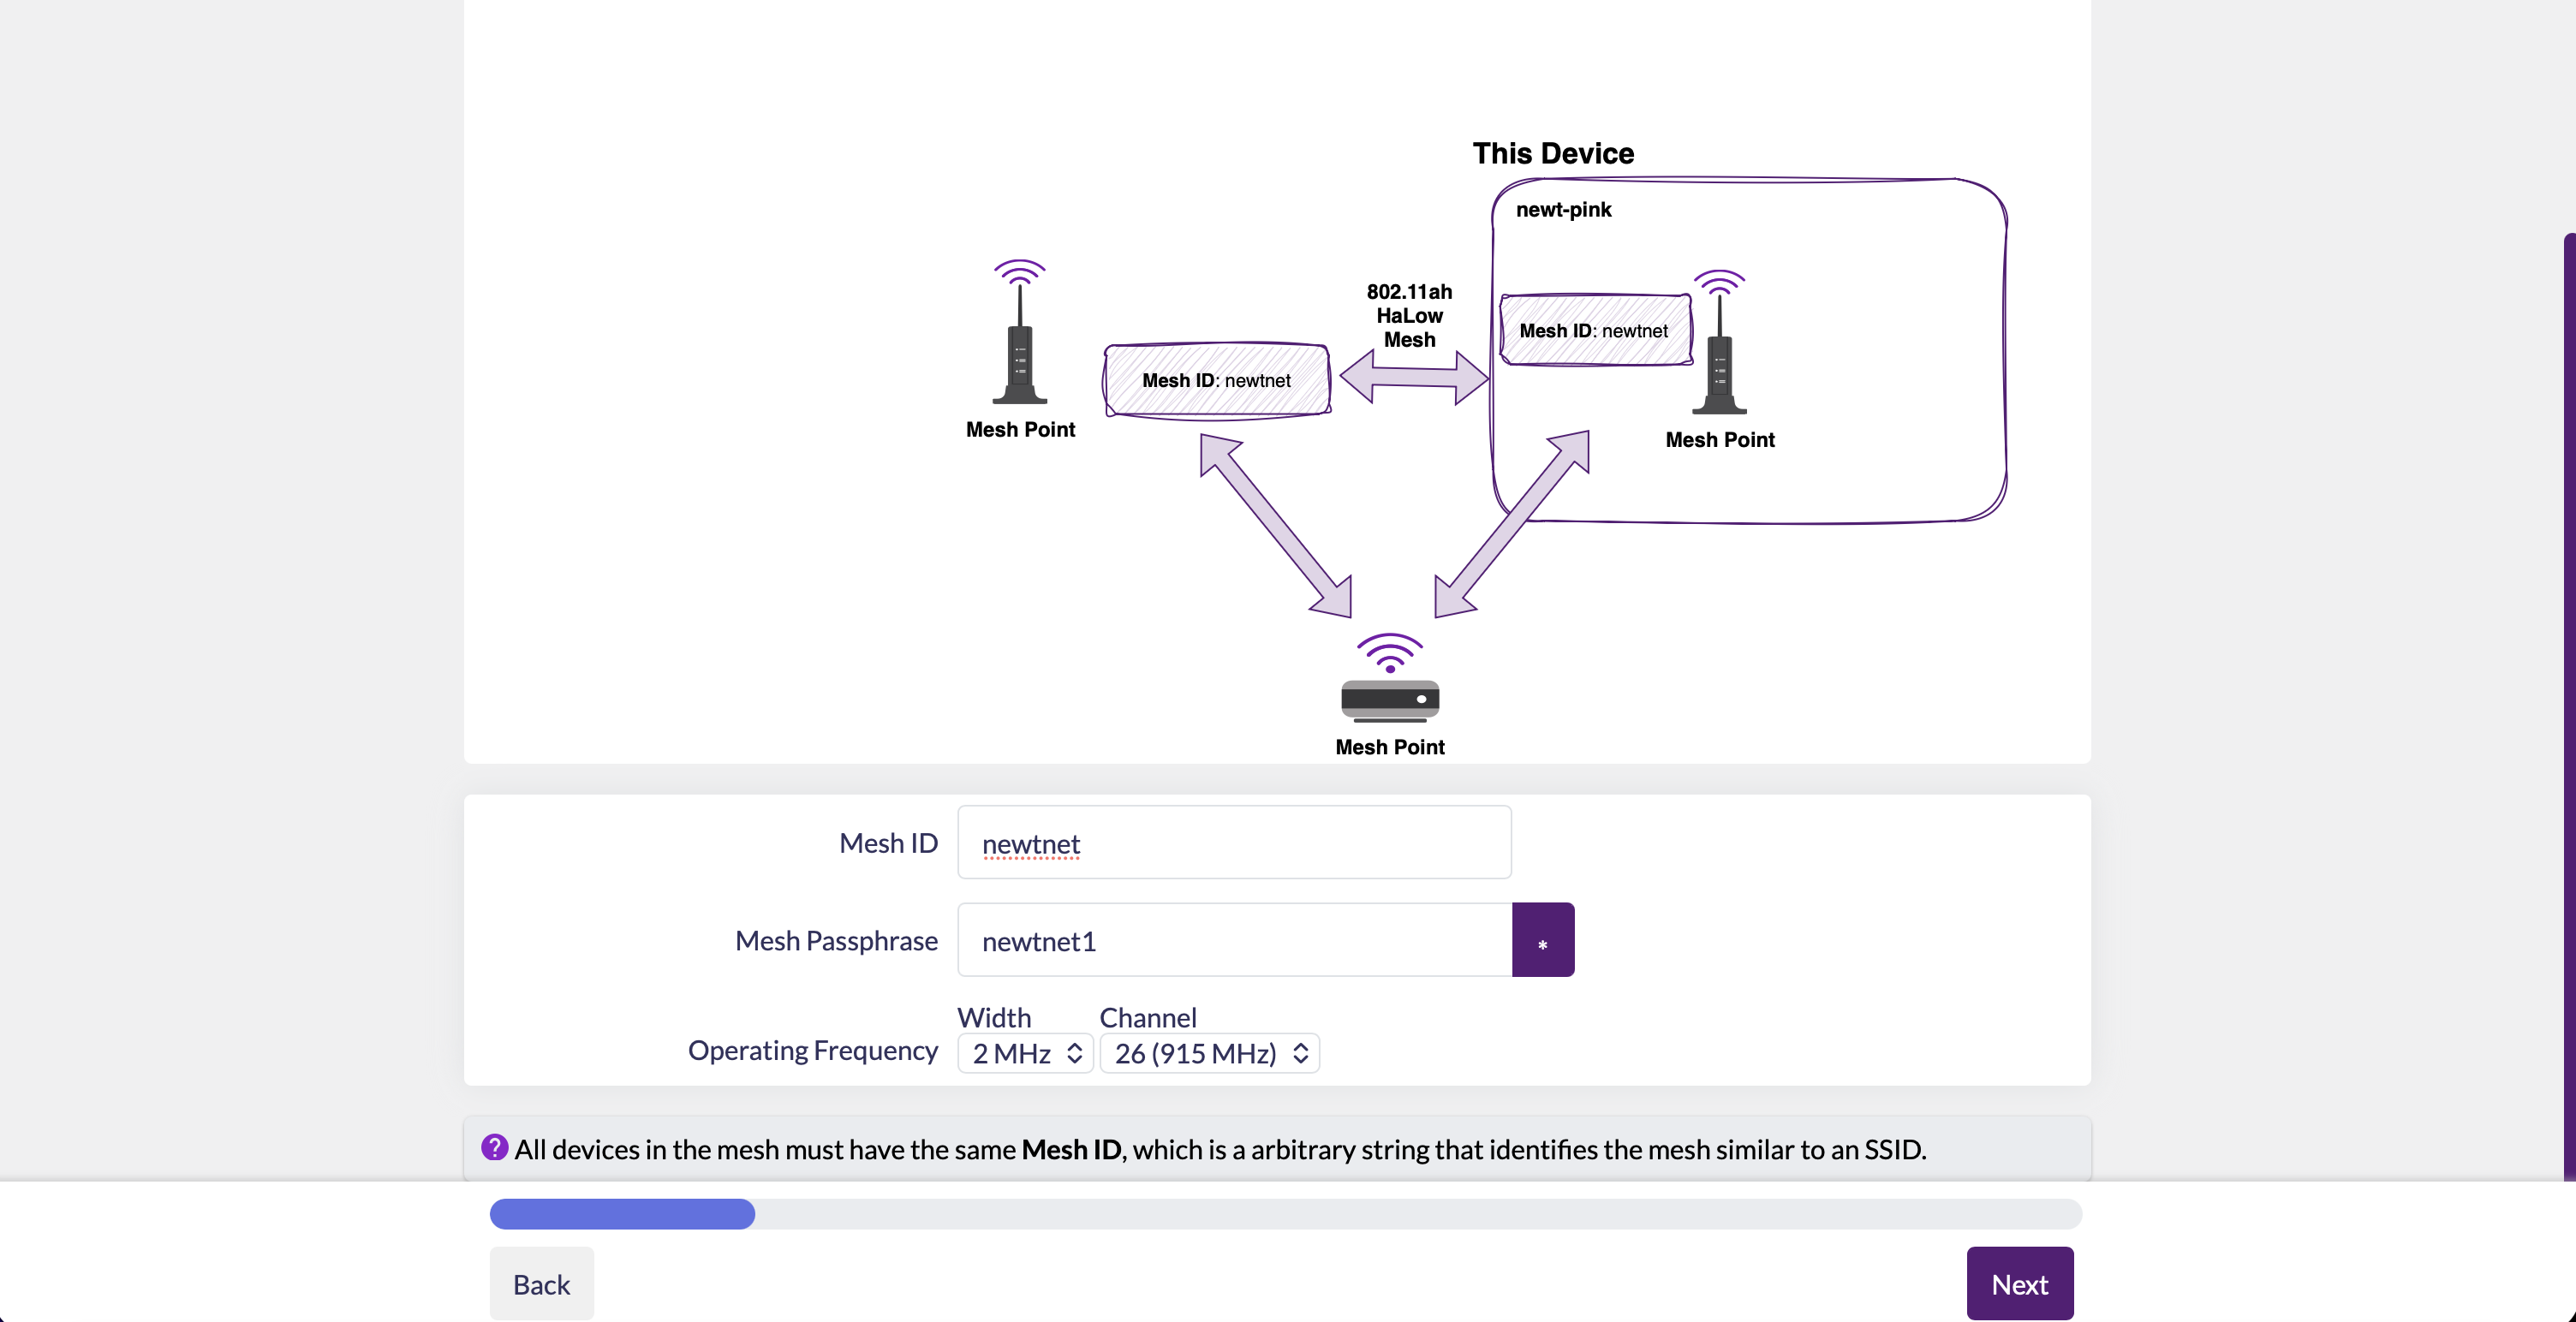
Once you select that you want to use this node as a bridge, which takes traffic from and funnels it back to the nearest gate node on the network, it will let you set up your 2.4 GHz access point. I used my diagnostic names, but remember to choose something different from the LuCI login!
newt-pink
Psswd:
newtpink1
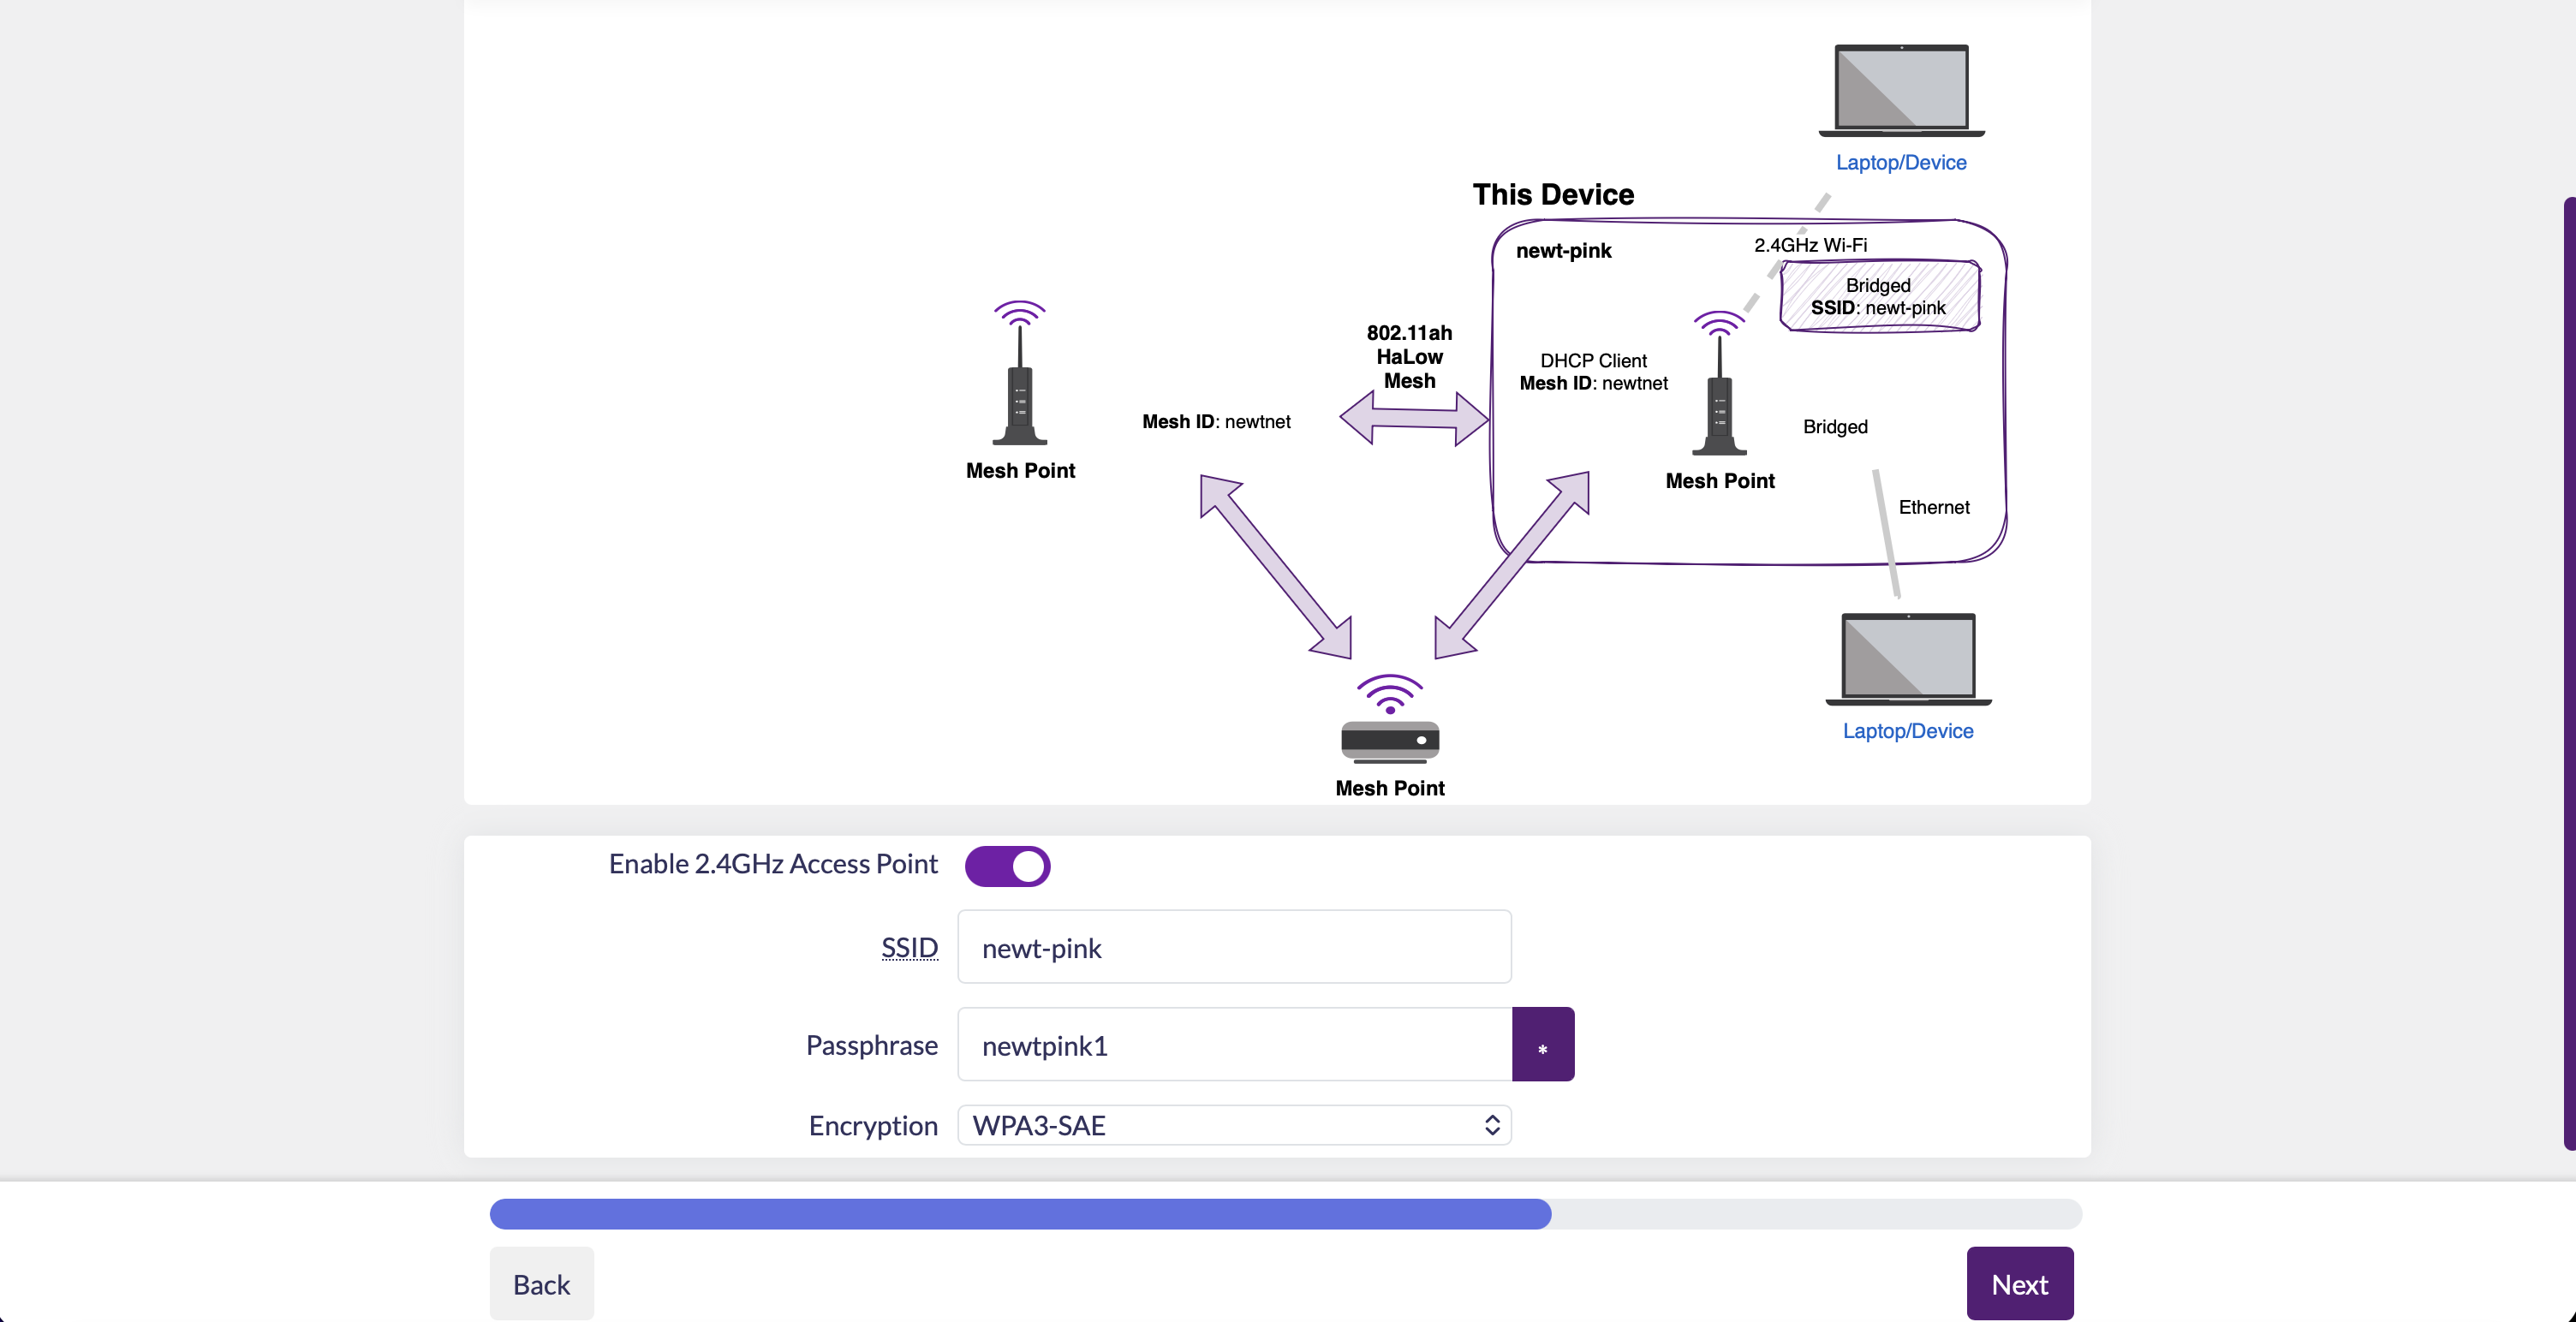
You're done! After you apply the changes, log back onto the LuCI portal of your gate node check out the 'Connected HaLow Devices' on the home page. That's the easiest place to learn the new IP address of your new point node! If the gate and point aren't connecting right away, you may have entered slightly different mesh information for each device. Use an ethernet cord and network settings to determine your new point node IP address, and then write down all your mesh nodes' IP addresses somewhere safe.
Application
Protestors, organizers, and journalists around the world--the people this guide was made for--are being more effectively targeted by governments, as increasing levels of tech adoption both enable digital mobs of resistance and lower the cost and complexity of mass surveillance. Multiple corporations are now competing with (and for) the federal government to build more and more detailed profiles on every single person with a digital footprint, and associating those profiles with real world data.
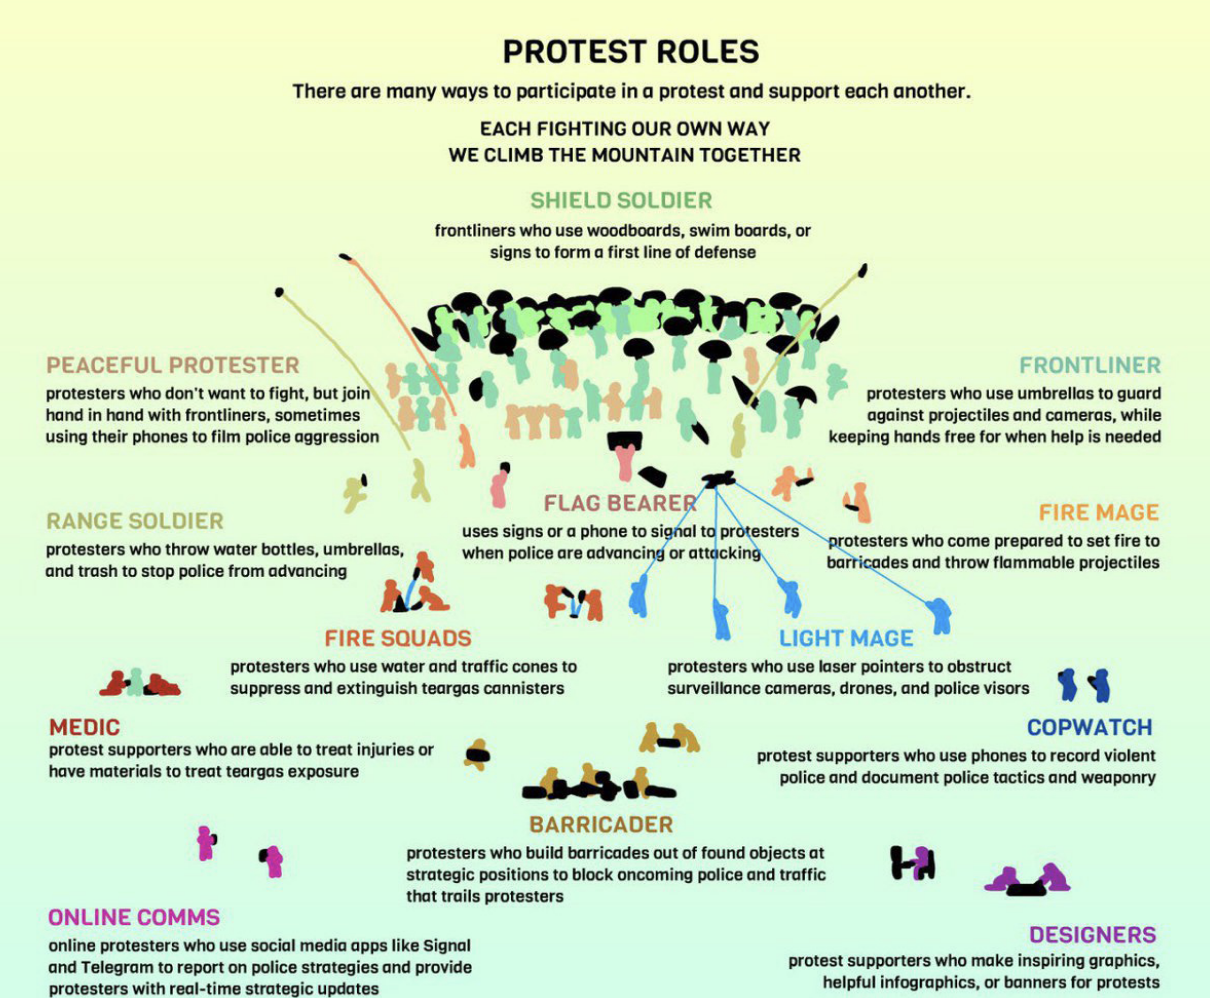
It's important to remember that not everyone at a protest has to be a frontliner or an organizer. There's a necessity for medics, scouts, traffic cordons, and dedicated comms personnel--just to name a few [Chan20]. The status quo in the United States at time of writing is purchasing radios to give to key organizers, and leaving the phones at home to escape the extrajudicial eye of the many federal agencies that operate with functional impunity. The first and fourth amendments can't survive these conditions without help.
The newt-net is a lower-cost and flexible alternative which allows you to expand the number of folks who can talk to each other or the world wide web as easily as giving them the WiFi password--no special hardware for every end user, no complicated software to teach on the fly. Access can be revoked digitally, and in a pinch the Panda WiFi dongle can be unplugged, cutting off the 2.4 GHz access point, and leaving the mesh intact while preventing local access to intruders.
Now you've built a tool to defend yourself and your community against these intrusions, but like any tool it's only as effective as the person using it. Now you have to train with it, learn about it, and practice implementing into your comms.
One of the first things to understand is what you've already accomplished, and how the settings we just applied are relevant to your specific use case. Channel width, for instance, directly affects the range of the nodes. The physics of the exponential relationship there are beyond the scope of this guide, but here's a graph from the Morse Micro website:
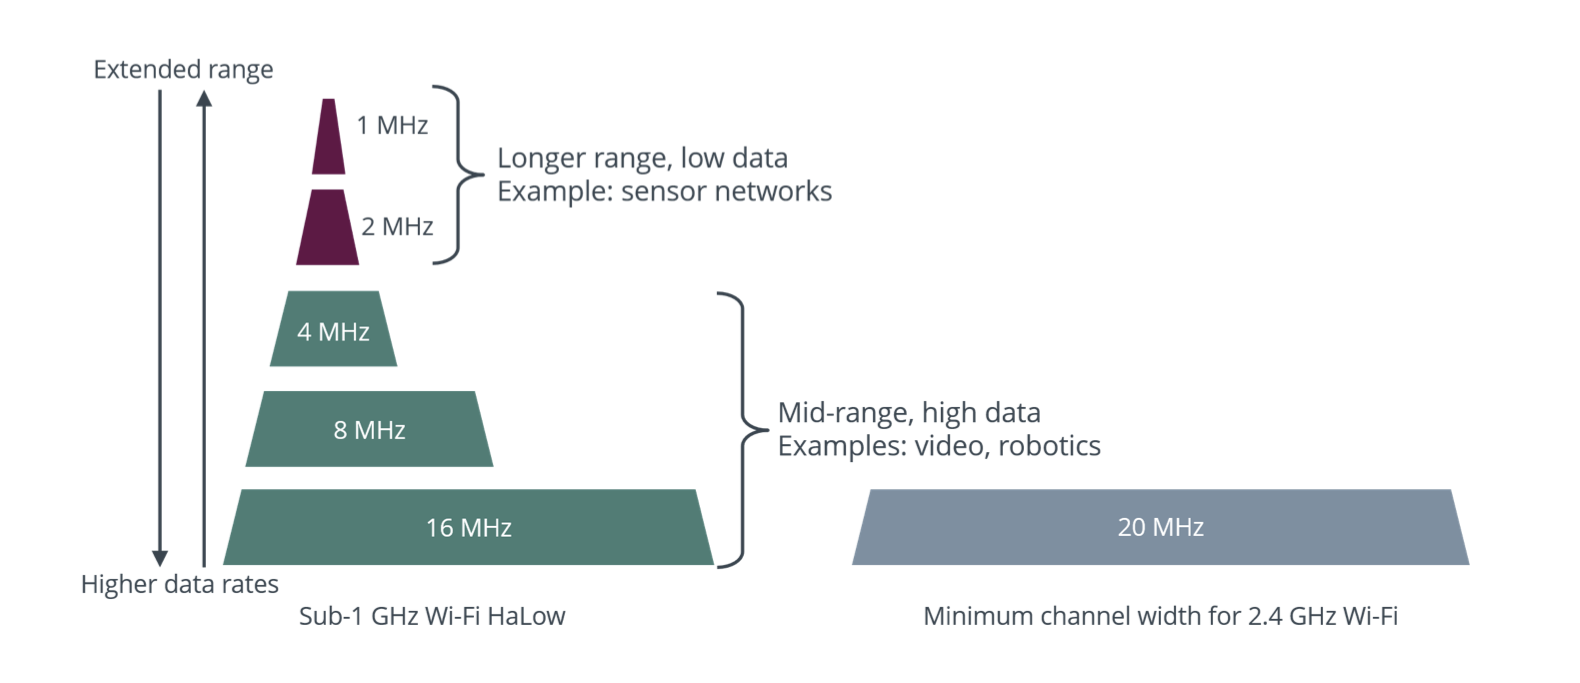
I conducted a range test of the newt-net in a dense suburban environment, and got a maximum text range of 500m between two nodes, with an expected maximum of seven hops between nodes, before the signal would degrade too much to be useful.

- 000m - Gate Node Location
- 180m - Usable FaceTime Connection
- 240m - Image Sending over Text
- 280m - Audio Call
- 500m - Max Texting Range
Changing to a channel width of 1 could potentially double my texting results, but at the risk of not being able to send photos over a busy network. What trade-offs are worth it for your organization?
I also have not had the opportunity to conduct a propper battery test, but was confounded when I tried to show off the newt-net after two days and couldn't get them to broadcast a WiFi access point--turns out they had too little voltage left to project one, even though they were still on! According to DataSlayer, he's gotten these nodes to run for seven hours of constant usage at a time. They can also be used as they're being charged with no issues, so you can hook them up to any sort of power pack or solar panel.
Future work that I didn't test includes integrating tactical software like over the nodes, combining these nodes with receivers for ultra-long range/ low-power redundancy, and using the nodes completely offline (no gate present) with based messaging apps.
Philosophy
taught us the lessons "be water" and "be fire," to describe the structure of successful, leaderful protest movements in the online era [Ting20]. A hierarchical network with tiered points of failure is as vulnerable as it is antithetical to a left-wing protest, which is all too clear when a government grows accustomed to civil rights abuses and decides to shut down the telecom provider at the top of the pyramid. Hierarchical networks that cede power to trusted authorities will never be as resilient as zero-trust mesh networks which can grow, flex, and heal as often as they need to--in order to accommodate the real-world situations around them. As Mark Qvist so succinctly puts it in The Zen of Reticulum, "a tool is intent, crystalized," so why not use a tool that fits the strategy of the movement?
Oh, and trans rights are human rights, Palestine will inevitably be free, ACAB, and feed your neighbors!